Morsdei Rules
An introductory edition for procedural playtesting. Updated 12 September 2026.
MORSDEI is a miniature-agnostic skirmish game about clashes between small warbands on a dense battlefield. Players alternate activating individual fighters, spend their actions on movement, attacks and objectives, and resolve each consequence immediately.
To play, you need these core rules, the cards for your chosen fighters, and a scenario. Warband construction and points costs are separate and are not included in this book.
What you need
- two complete warbands with a card for every fighter;
- a 30×22 inch play area;
- a dense set of terrain;
- three round Loot Point markers, approximately 40 mm in diameter;
- a tape measure or ruler marked in inches;
- several ordinary six-sided dice, or d6;
- activation, Counteract, Take Cover, Loot and round markers;
- dice, tokens or a written record for every fighter’s current HP.
All suitable miniatures, conversions and proxies are allowed. Every fighter must use the base size stated on its card. If the miniature’s original base is different, place it on a temporary base or adapter of the required size. Use this game base for distances and movement, and the physical model on the table for visibility.
Core terms
Fighter means one model together with its base and card.
A friendly fighter belongs to your warband. An enemy fighter belongs to your opponent.
The active fighter is the fighter whose activation is currently being resolved.
A ready fighter has not activated in the current round. An activated fighter has completed its activation.
Within a distance means at that distance or closer. If a rule requires a fighter to be within 1 inch, a distance of exactly 1 inch qualifies.
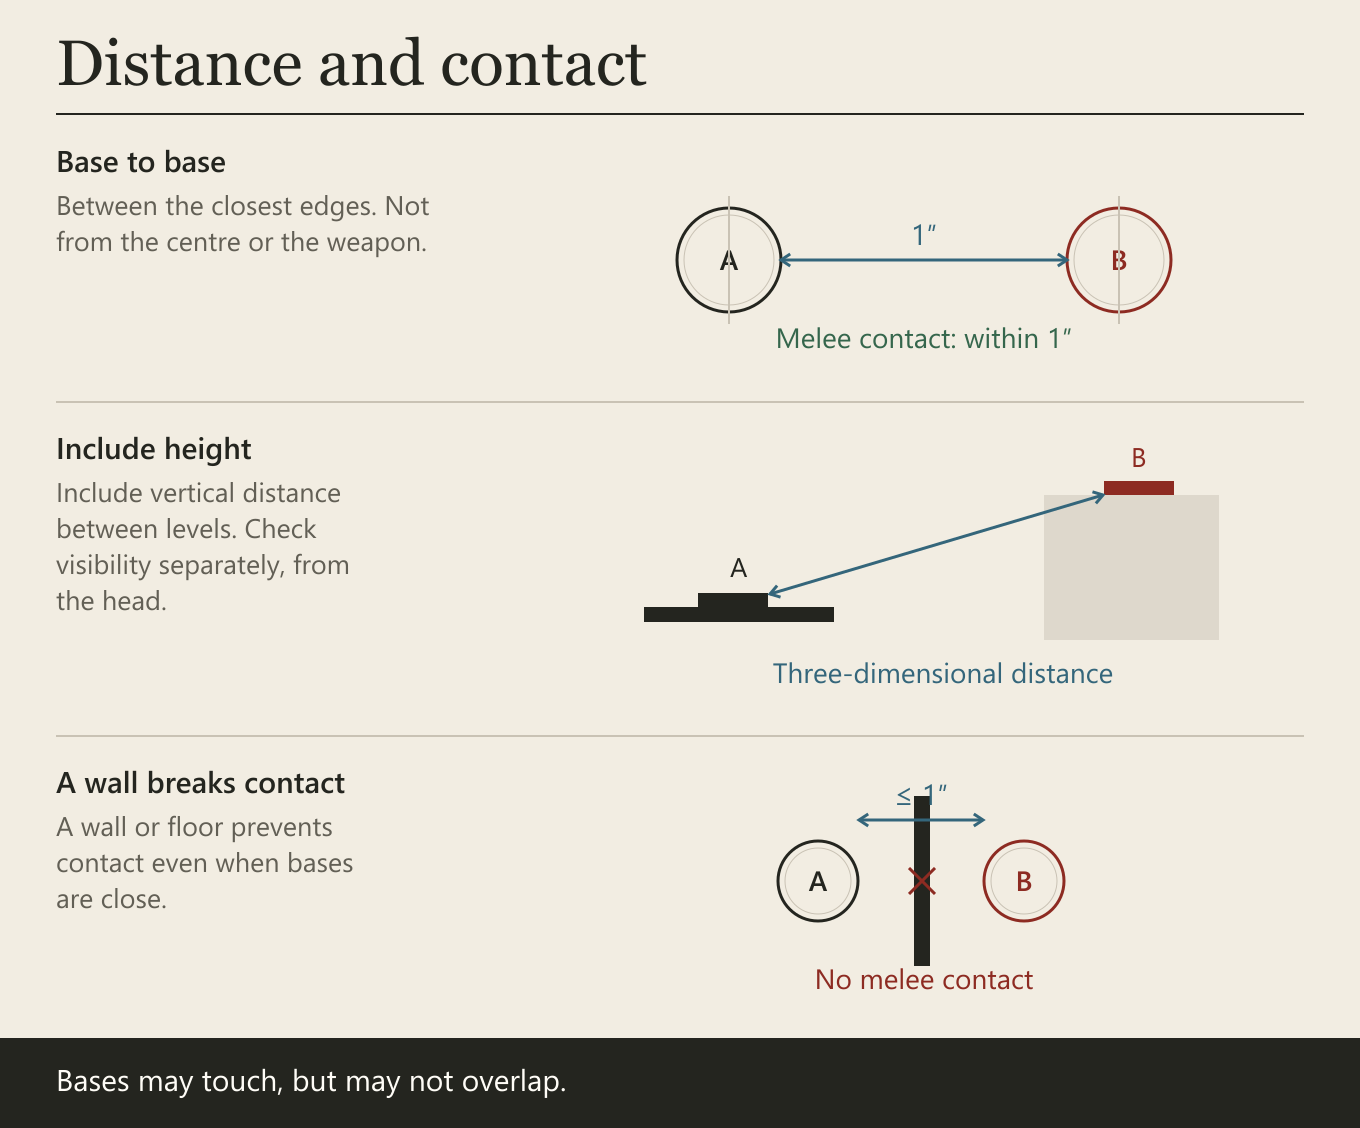
Melee contact exists when the closest points of two opposing bases are no more than 1 inch apart and no wall, floor or other impassable terrain lies between the fighters. Base contact is not required. When fighters are at different heights, include vertical distance: fighters cannot fight through a wall or floor even when their bases are close.
Damage reduces a fighter’s current HP. At 0 HP or less, the fighter is incapacitated.
d6 dice
MORSDEI uses only ordinary six-sided dice.
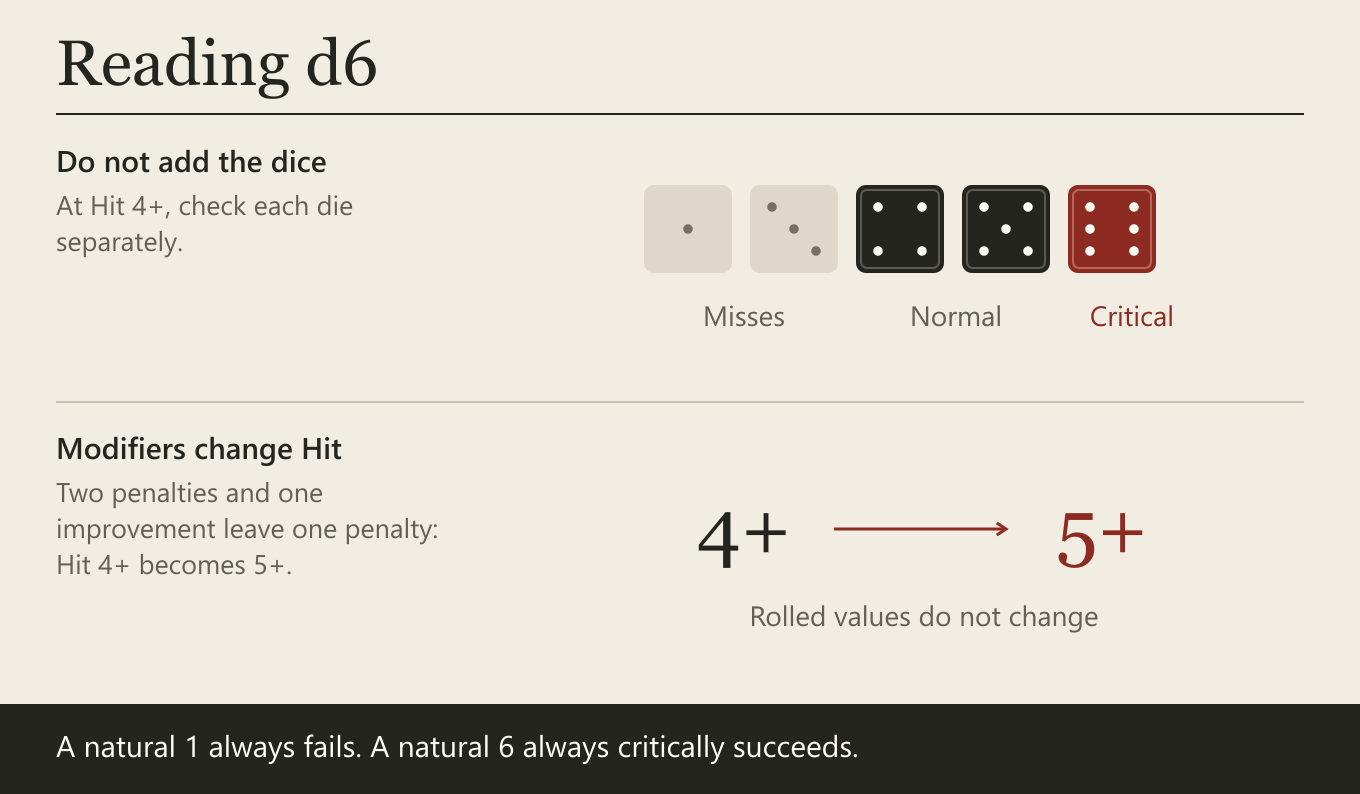
d6 means one die. 4d6 means four dice. When a rule asks for a dice pool, roll the stated number of d6 together and read every result separately. Do not add the results unless a rule explicitly says otherwise.
Ones and sixes
- A natural
1always fails, regardless of characteristics and modifiers. - A natural
6is always a successful critical result, regardless of characteristics and modifiers. - A critical result does not automatically inflict extra Damage. Its specific effect is defined by the procedure in which it was rolled.
In a ranged attack, a six is a critical hit. In defence, a six is a critical save. In melee, a six is a critical die that the opponent cannot Parry or remove with Guard.
If a future test has no separate critical effect, a natural six is simply a guaranteed success.
Hit
Hit is the minimum successful result for an attack die. For example, Hit 4+ means:
1–3fail;4–5are normal successes;6is a critical success.
A lower Hit is more accurate: 3+ is better than 4+, while 5+ is worse than 4+.
Improving and worsening Hit
Improving Hit by 1 lowers the required number by one:
5+ → 4+ → 3+ → 2+
Worsening Hit by 1 raises the required number by one:
2+ → 3+ → 4+ → 5+ → 6+
All active improvements and penalties stack. Opposing modifiers cancel each other one for one.
Example: a weapon has Hit 4+. The fighter suffers two penalties and gains one improvement. The improvement cancels one penalty, leaving one penalty and a final Hit of 5+.
Final Hit can never be better than 2+ or worse than 6+. A natural one still fails at Hit 2+, and a natural six still critically succeeds at Hit 6+.
Modifiers change the Hit characteristic, not the values of dice already rolled.
Changing a pool
+1 Attack Die, +1 Combat Die or +1 Defence Die adds one d6 to that roll. −1 Die removes one d6.
Changes to the same pool stack. Opposing changes cancel first, then the final number of dice is rolled. A pool cannot contain fewer than zero dice.
The same named effect does not stack with itself unless its rule explicitly says otherwise. Different effects stack. Cover and Take Cover therefore grant +2 Defence Dice together, but taking cover twice does not grant another die.
Re-rolls
The core rules grant no free re-rolls. If a card or special rule permits one:
- each specific die may be re-rolled no more than once;
- the new result is binding even if it is worse;
- natural ones and sixes are determined from the final result after the re-roll.
Roll-off
When players are told to decide something by a roll-off, each rolls one d6. The higher result wins; re-roll ties. A roll-off cannot be modified unless a rule explicitly says otherwise.
Fighter cards
A card contains all characteristics, weapons, traits and special actions for a fighter. If a card contradicts a general rule, use the more specific card rule. A direct prohibition always overrides permission.
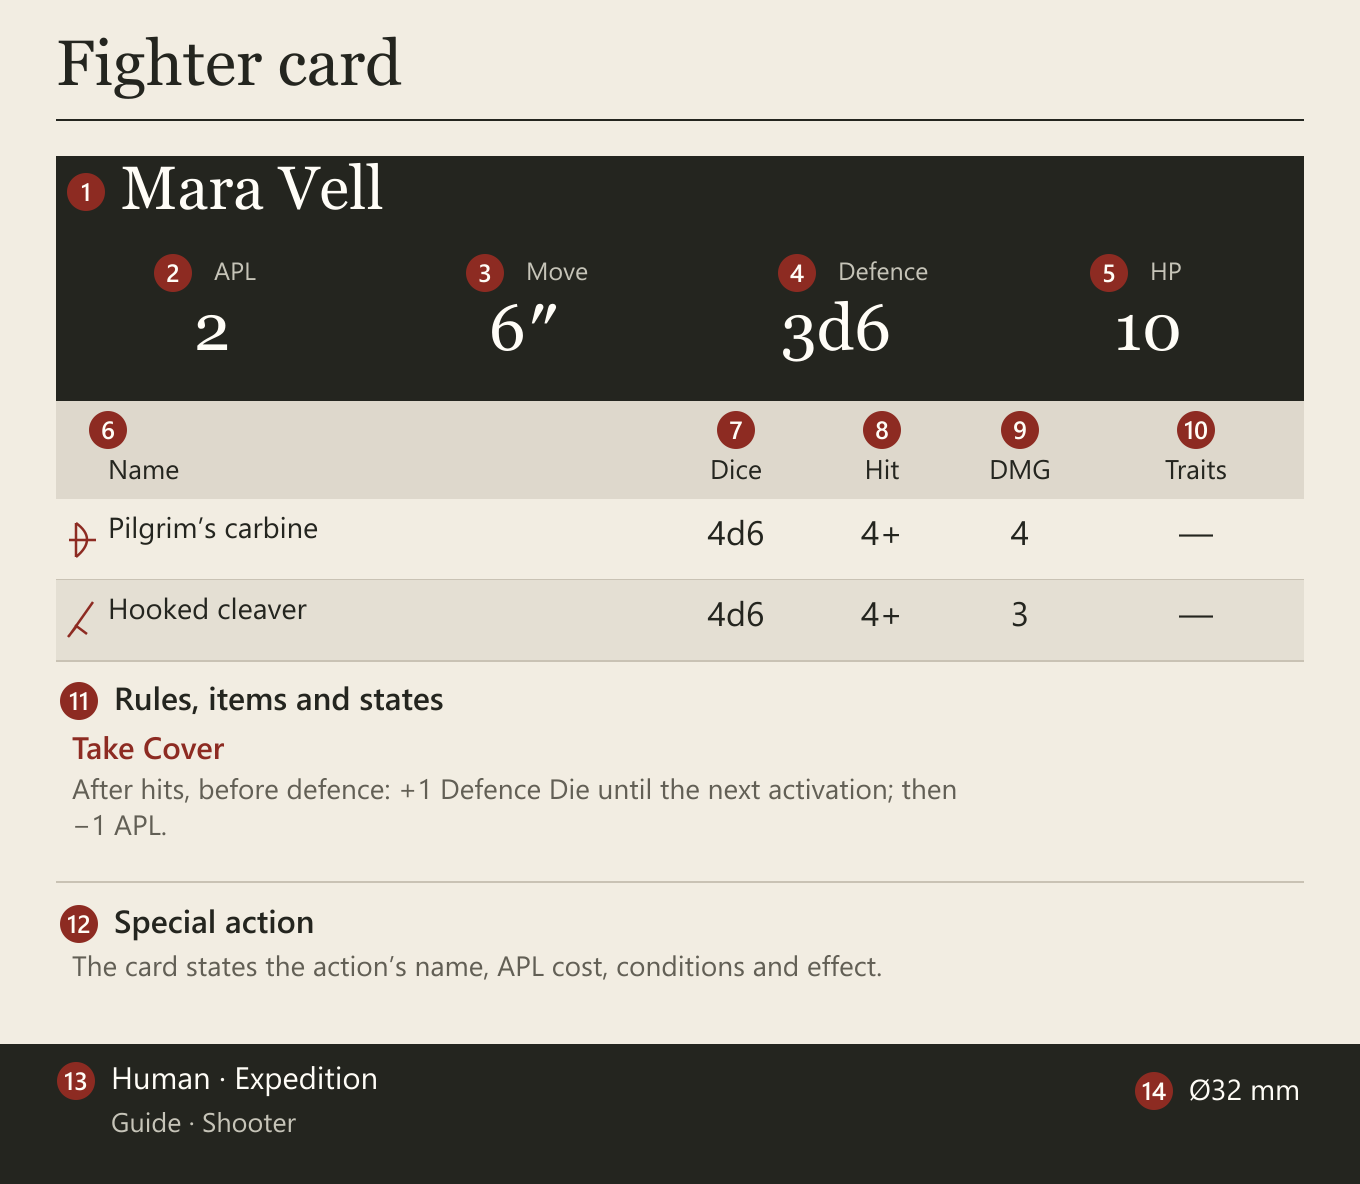
- Name — the name of the fighter.
- APL — Action Point Limit: the action points the fighter receives during its activation.
- Move — the maximum distance of one Move action.
- Defence — the basic number of Defence Dice rolled against a ranged attack.
- HP — starting and maximum health.
- Weapon — the name and type of each available weapon. An icon or label distinguishes ranged and melee weapons.
- Dice — Attack Dice when Shooting or Combat Dice when fighting in melee with that weapon.
- Hit — the minimum successful result for each attacking die.
- Damage / DMG — HP removed by each uncancelled hit or accepted strike.
- Weapon traits — extra keywords and exceptions. A dash means there are none.
- Rules, items and states — permanent or temporary effects applying to the fighter and its equipment.
- Special action — a unique action and its APL cost. Its conditions and effects are written in the block.
- Keywords — fighter categories used by other rules.
- Base size — the base for which the profile is designed.
The pictured card is a demonstration. Use the numbers and rules on the cards for your chosen warband.
Measuring and placement
- Measure every distance in inches.
- Measure between fighters from the closest points of their bases.
- Measure weapon range from the closest points of the shooter’s and target’s bases.
- Check line of sight separately from the acting model’s head.
- Any distance may be measured at any time.
- Bases may touch but may not overlap.
- The entire game base must remain inside the play area throughout movement, not only at its end.
If a model ends movement on terrain, it must stand securely without support and must not fall. Its base may partly overhang the edge of a stable surface.
Actions and APL
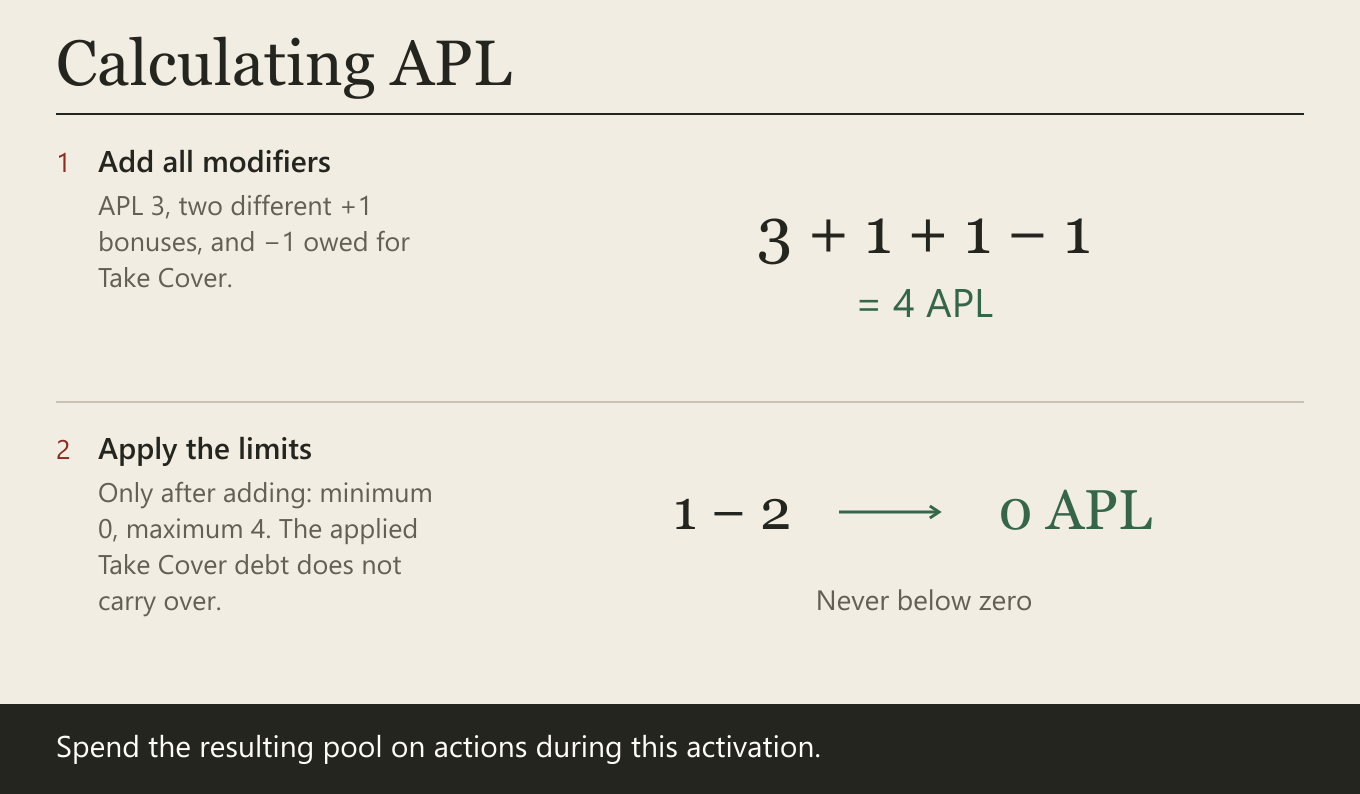
When a fighter activates, it receives the APL shown on its card after applying active effects.
Add all bonuses and penalties, including Take Cover debt, then limit the result to 0–4. Apply a named effect only once unless its rule permits stacking. Remove a Take Cover marker after applying its debt; do not carry that debt forward. The resulting pool is not recalculated halfway through the activation unless a rule explicitly changes it.
APL example. APL 3, two different +1 bonuses and Take Cover give 3 + 1 + 1 − 1 = 4 APL. APL 1 with a total penalty of −2 becomes 0 APL.
- Every action has an APL cost.
- A fighter cannot spend more APL than it has available.
- Declare and resolve actions one at a time. You do not declare the entire activation in advance.
- After an action is fully resolved, decide what to do next.
- A fighter may voluntarily end its activation at any time. Unspent APL is lost.
- Move, Shoot and Fight may be repeated in the same activation unless a special rule prohibits it.
- Other actions cannot be repeated in the same activation unless their rule explicitly permits it.
If all conditions are met and the cost is paid, an action succeeds automatically unless a card, scenario or module explicitly requires a test. Attacks still use their own rolls as part of the Shoot or Fight procedure.
Resolve every action in this order:
- declare the action and, when required, its target, weapon or object;
- check all known conditions, including availability, distance, visibility and restrictions;
- spend the listed APL;
- fully resolve the action before beginning another.
Impossible actions
Check an action’s conditions before beginning. If it becomes clear that the action cannot be completed, cancel it:
- return models, markers, HP and all other elements to their state before the action was declared;
- do not spend APL for the cancelled action;
- choose another action or end the activation.
For example, if a fighter begins climbing but cannot stand securely on the chosen surface, return it to its starting position and do not spend APL.
Core actions
Basic-game actions
| Action | Cost | Short effect |
|---|---|---|
| Move | 1 APL | Move up to the fighter’s Move |
| Shoot | 1 APL | Resolve one ranged attack |
| Fight | 1 APL | Resolve one exchange with an enemy in contact |
| Loot | 1 APL | Gain 1 VP at an uncontested scenario point |
| Fall Back | 2 APL | Safely leave melee contact |
Module-enabled actions
These actions belong to the game’s general framework but are unavailable unless a card, scenario or enabled module defines their use.
| Action | Cost | When it is used |
|---|---|---|
| Interact | 1 APL | Resolve an action involving an object or mechanism defined by the scenario |
| Pick up or pass | 1 APL | Pick up or pass an object defined by a scenario or module |
| Recover | 1 APL | Remove a state whose rule permits Recover; used by optional modules |
A fighter card may grant special actions. Their cost, conditions and effects are written on the card.
Recover and modular rules. In a core game without optional modules, Recover has no eligible target and therefore cannot be performed. It becomes available when the Stress module or another state module is enabled. That module states which conditions Recover removes and whether it has any additional requirements.
Movement
Normal movement — 1 APL
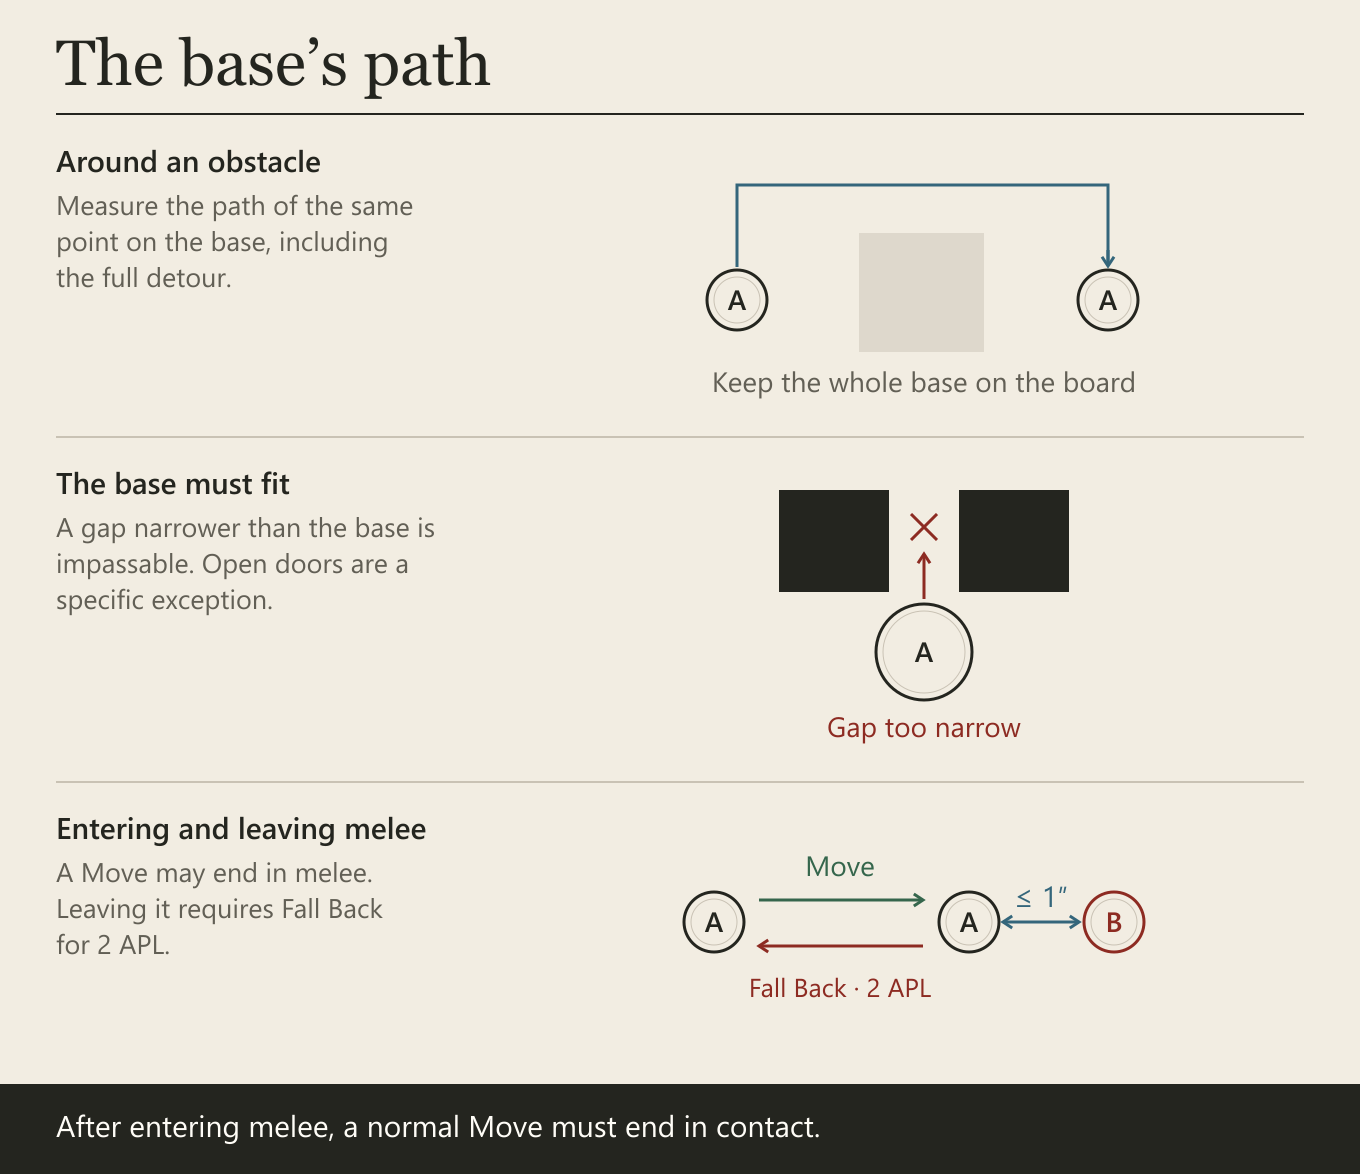
Move the fighter no farther than its Move. Measure the base’s actual path, including movement around obstacles.
- A fighter may move through a friendly model and its base, but may not end with bases overlapping.
- A fighter may not move through an enemy model or its base.
- A fighter may not move through a wall or other impassable object.
- The base’s entire physical path must fit through free space: a model cannot squeeze through a gap narrower than its base. Friendly models and open doors are the stated exceptions.
- A fighter that begins the action in melee contact cannot make a normal Move. It must use Fall Back.
- A normal Move may end within 1 inch of an enemy and create melee contact.
- Once a fighter enters melee contact during a normal Move, it cannot continue moving out of that contact; the move ends in contact.
- A fighter may move less than its maximum or remain in place.
Two consecutive Move actions are sometimes called a dash. This is not a separate action and grants no bonus distance.
Climbing
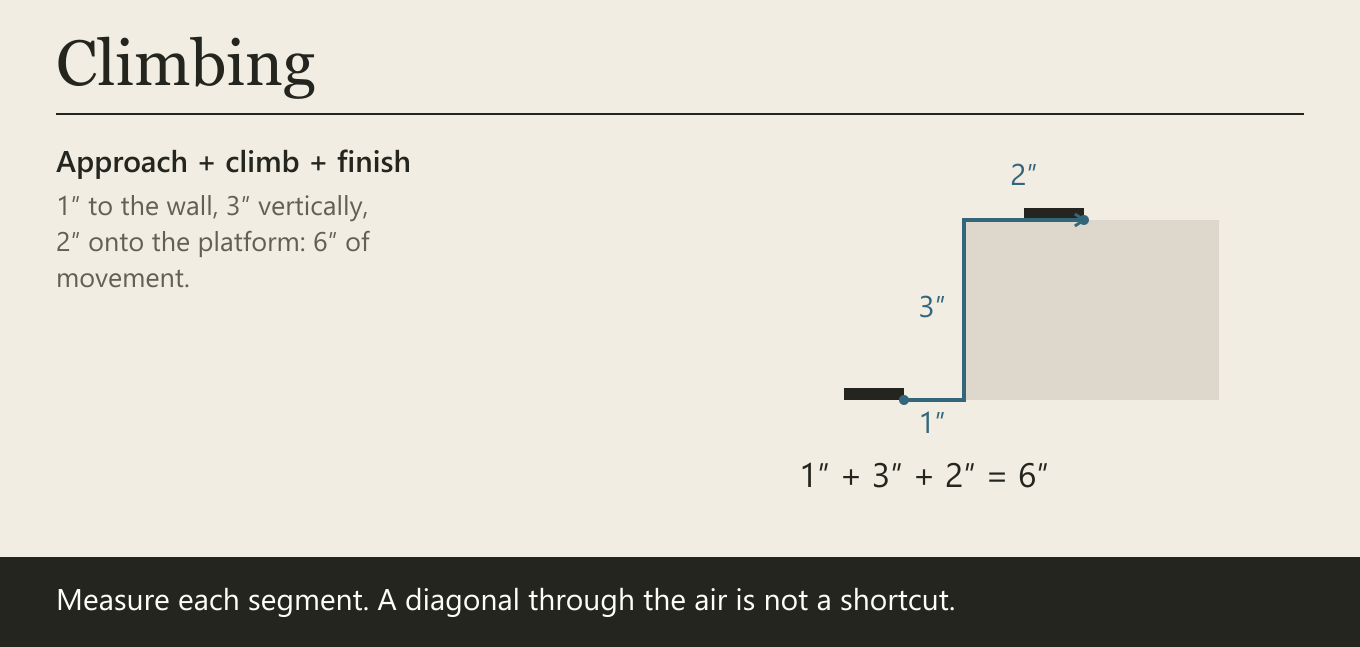
Climbing is part of movement. First reach the surface, then climb vertically along it, then move the base onto a stable platform. Count all three segments separately against the movement allowance. Do not cut diagonally through the air or pass through walls or overhanging floors.
If a fighter climbs 3 inches and then moves 2 inches across a platform, it has used 5 inches of movement.
Controlled descent
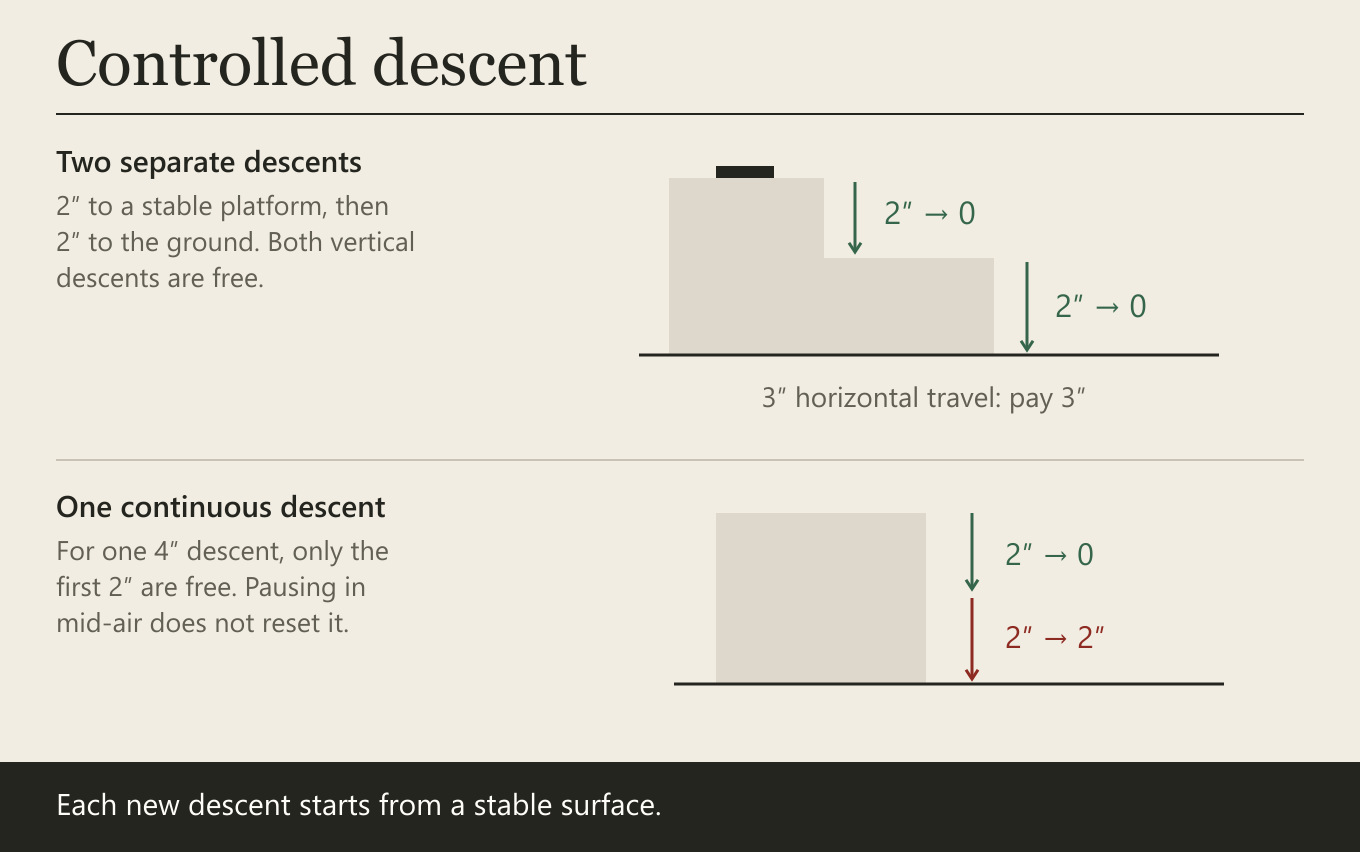
In each separate descent, the first 2 inches of vertical movement are free. Count the remaining vertical distance and all horizontal travel. A separate descent ends on a stable surface; starting from that surface resets the free 2 inches. Pausing in mid-air does not.
The fighter must end on a stable surface and cannot end movement in mid-air.
Jumping a gap
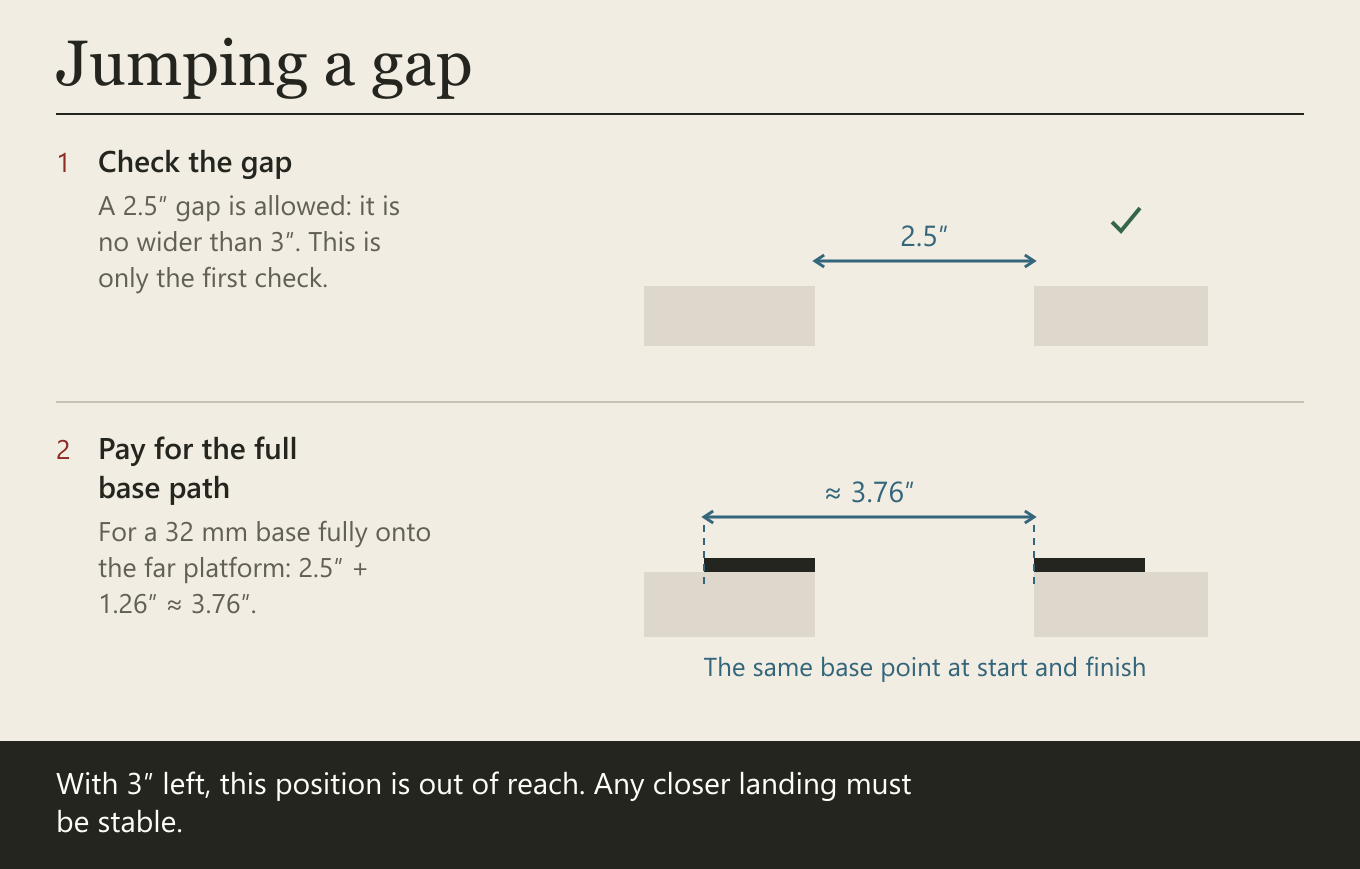
A fighter may jump a gap up to 3 inches wide as part of movement. Check both the width of the gap and the complete path of the same point on the base, including the final placement. The complete path must fit within the remaining movement allowance. Use the climbing and descent rules for changes in height. The model must stand securely without support; a stable partial overhang is allowed. A 32 mm base fully crossing a 2.5 inch gap travels approximately 2.5 + 1.26 = 3.76 inches, so that final position cannot be reached with only 3 inches left.
Low obstacles
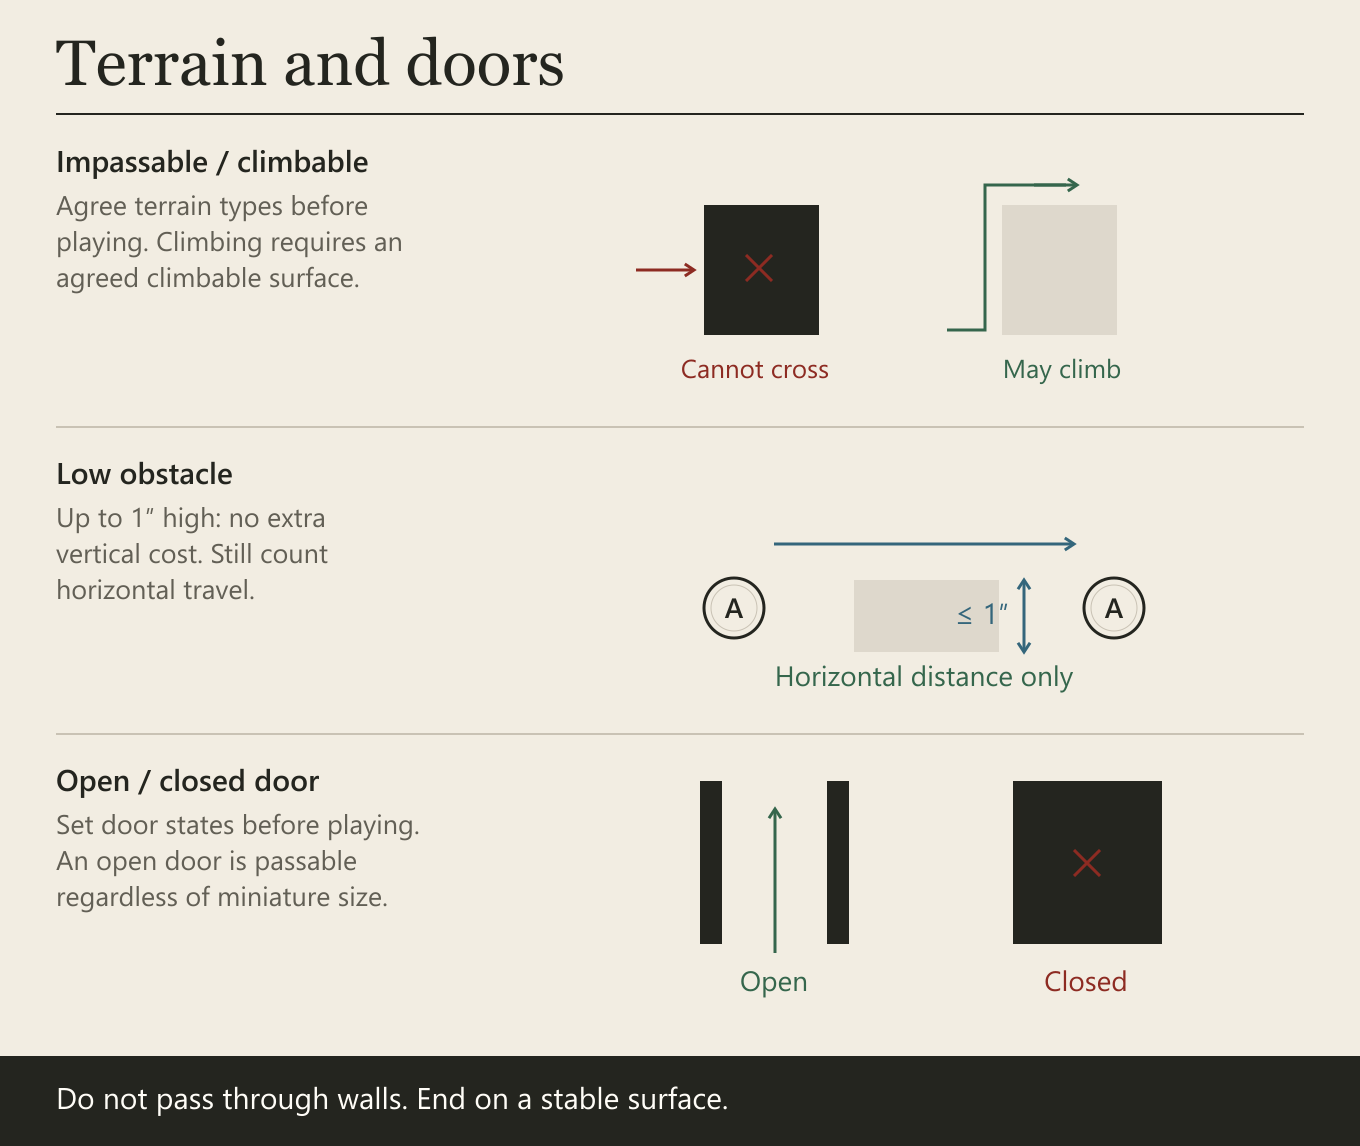
An obstacle up to 1 inch high may be crossed at no extra cost. Count only the base’s horizontal path.
Charge
There is no separate Charge action. Charge is a convenient name for Move + Fight. A normal Move brings the fighter into contact, then Fight is resolved as a separate action for 1 APL. Charging grants no automatic bonus.
Fall Back — 2 APL
Fall Back lets a fighter safely leave melee contact.
Move the fighter up to its Move so that it ends more than 1 inch from every enemy. Enemies receive no free attacks.
Terrain
Before the game, players must agree on the function of every terrain element.
- Impassable terrain cannot be crossed.
- Climbable terrain permits climbing and placement on stable surfaces.
- A low obstacle up to 1 inch high is crossed at no extra cost.
Doors are a distinct terrain element, but active opening and closing are not used in this edition. Before the game, define each door as permanently open and passable or permanently closed and impassable. An open door is passable regardless of whether a particular miniature physically fits through the opening.
Visibility and cover
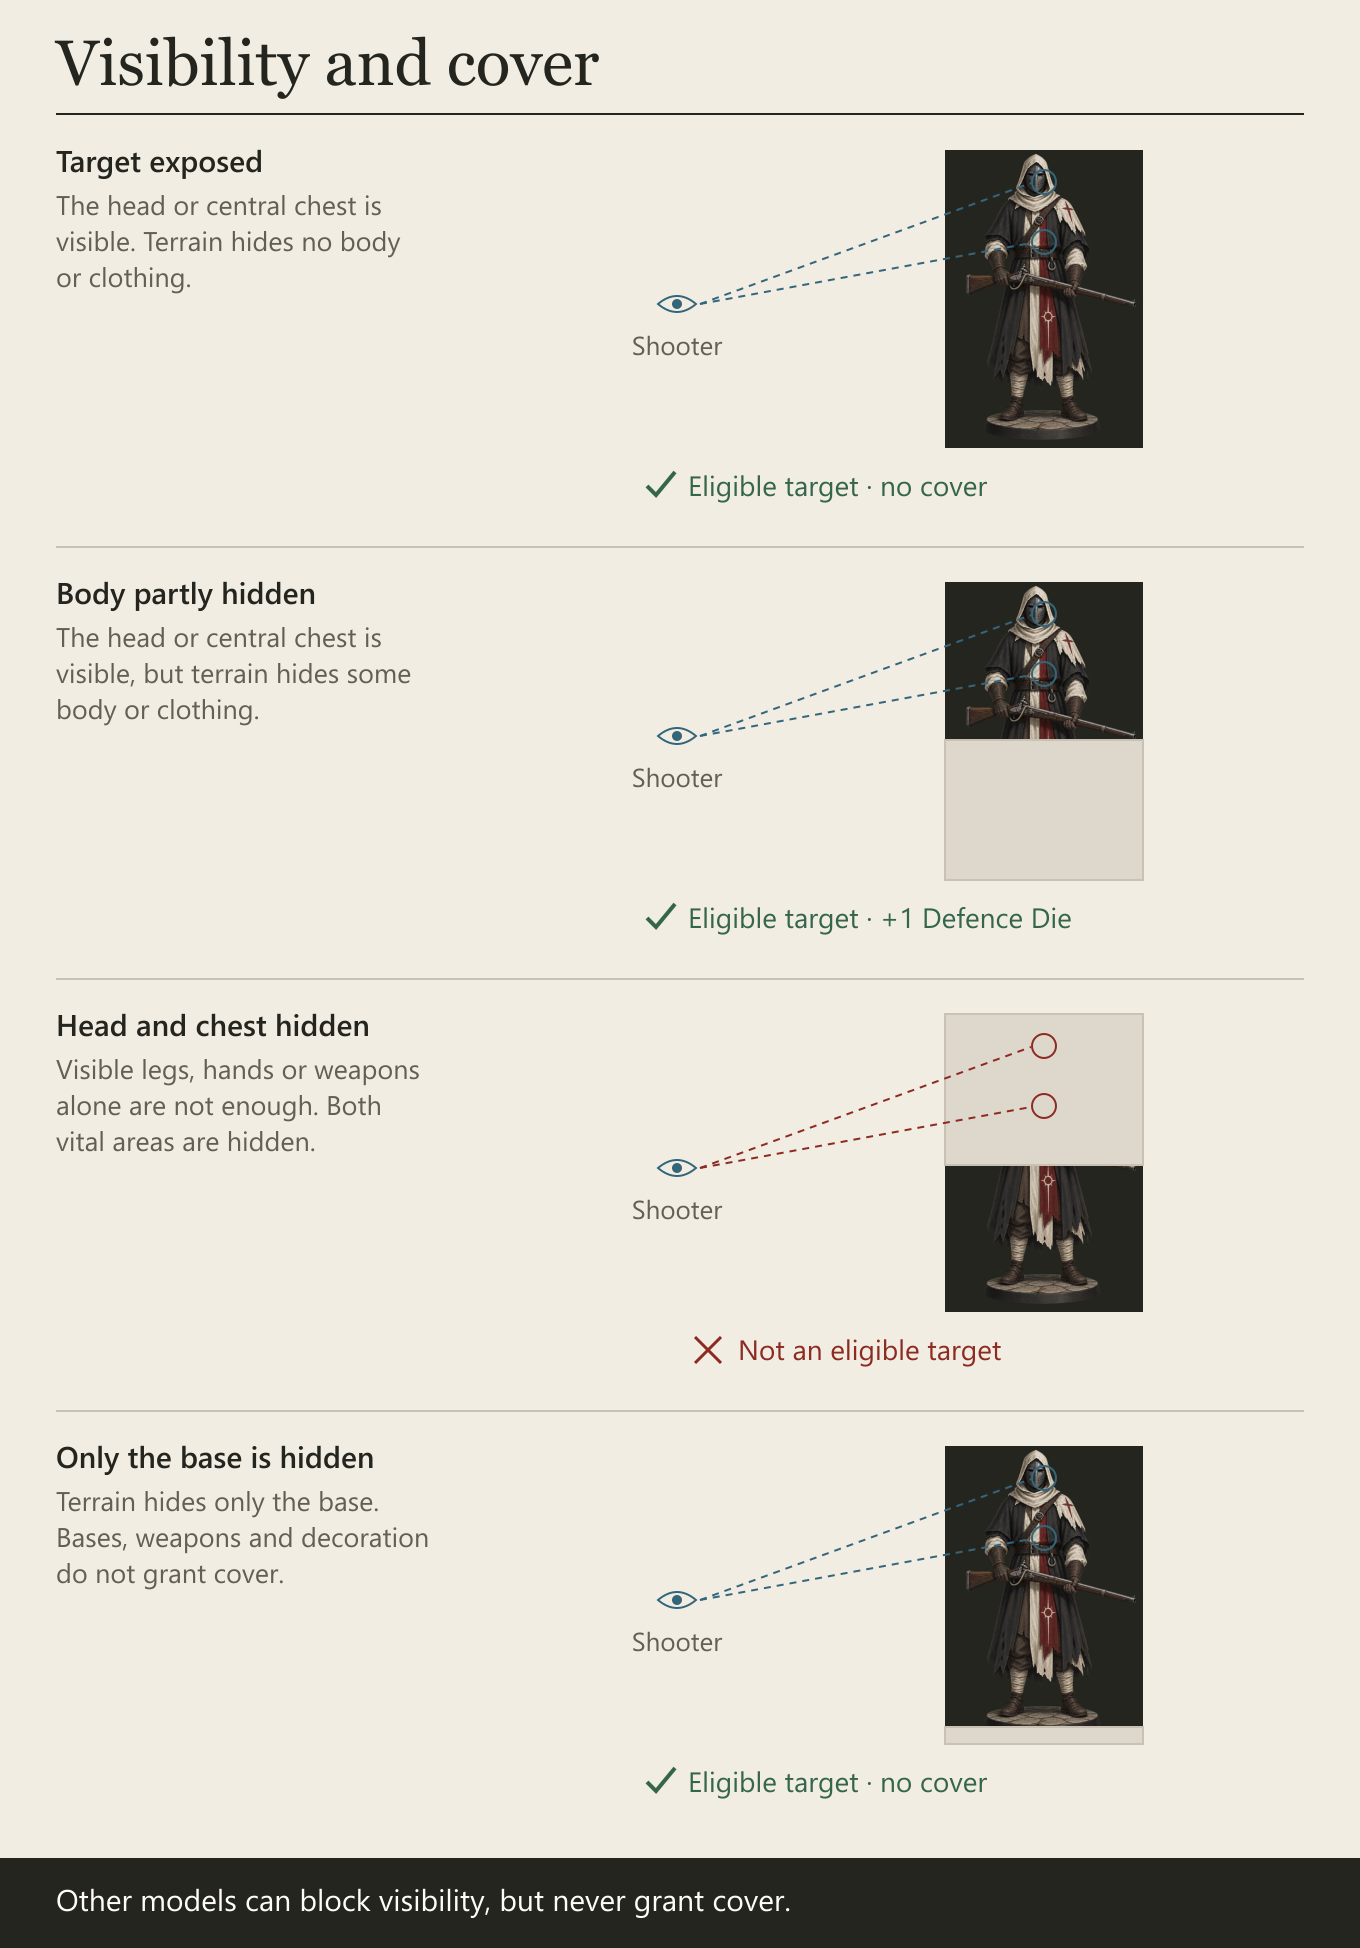
To check visibility, look from the acting model’s head to the target model.
Eligible target
- If the target’s head or central chest—the approximate heart area—is visible, it is eligible.
- If neither the head nor heart area is visible, it is not eligible.
- A visible hand, leg, weapon, edge of clothing, decoration or base alone does not make a target eligible.
Friendly and enemy models physically block line of sight in the same way. They can completely hide a target’s vital areas but never grant it a cover bonus.
Cover
An eligible target is in cover if, from the shooter’s viewpoint, terrain hides any part of its body or clothing. The size of the hidden part does not matter.
By default, any physical terrain element between the shooter and target can grant cover if it actually hides part of the target’s body or clothing. Transparent or purely decorative elements grant cover only when a map or scenario explicitly says so. Friendly and enemy models never grant cover.
Ignore the target’s base, weapons and decorative elements. If terrain hides only those elements, the target does not gain cover.
A target in cover gains +1 Defence Die against a ranged attack. This bonus stacks with Take Cover.
If a disagreement over visibility or the presence of cover lasts longer than 15 seconds, roll a d6. On 4–6, the target is eligible or gains the disputed bonus for this attack only; on 1–3, it does not. After the game, record the dispute and clarify that terrain before the next test.
Rounds and activations
A game lasts four rounds unless one side is destroyed earlier.
Beginning the first round
After setting up the battlefield, both players roll off. The winner chooses who is the first player in round one.
Beginning every round
- Remove Loot markers from the points.
- Remove activation and Counteract markers.
- Ready every living fighter.
In every round after the first, the player who did not begin the previous round becomes first player.
Activation
The first player chooses one ready fighter and completes its activation. At the start of the activation, determine available APL from the card and apply any APL debt from Take Cover. The opponent then activates one ready fighter. Continue alternating.
After the activation ends, mark the fighter as activated. It cannot activate again during the round in the normal sequence.
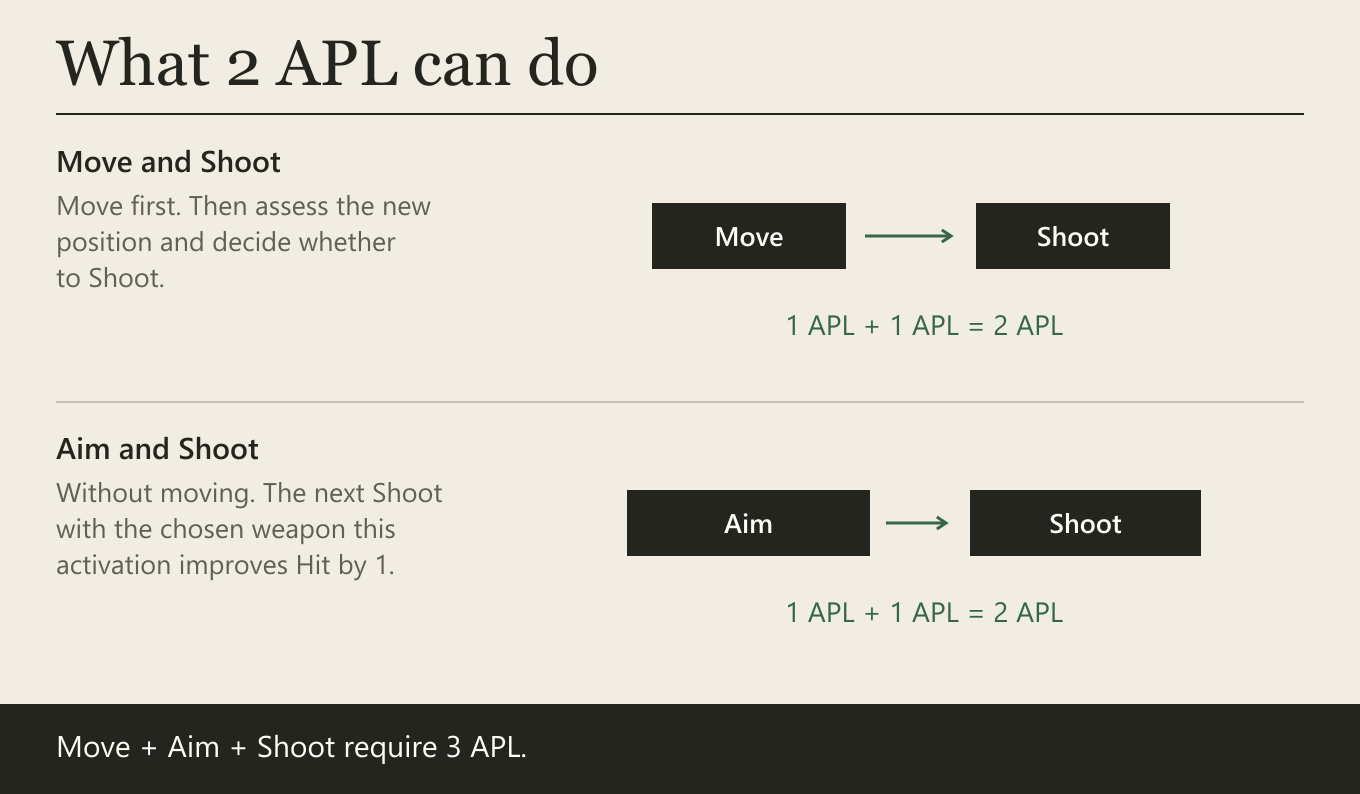
Activation example. With 2 APL, a fighter may Move, assess its new position, then Shoot. Alternatively, it can Aim and Shoot without moving. Move + Aim + Shoot requires 3 APL.
Counteract
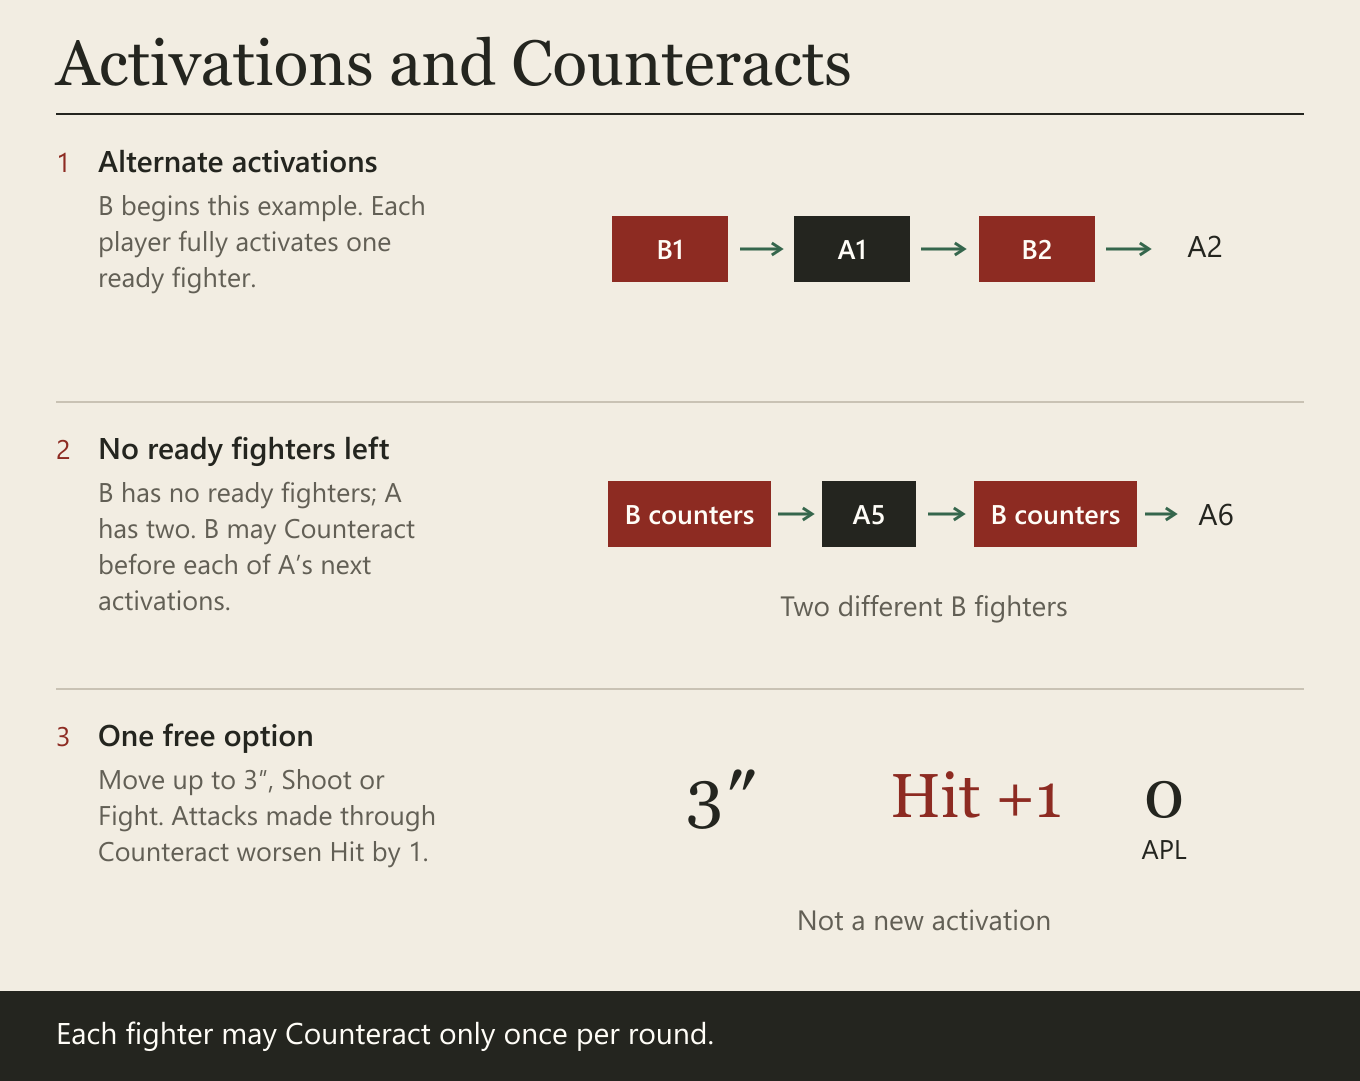
If a player has no ready fighters while their opponent still has some, they may Counteract with one of their activated fighters instead of activating.
Each fighter can Counteract no more than once per round. Mark a used Counteract separately.
Counteract allows one of the following for free, without spending APL:
- move up to 3 inches;
- Shoot with the chosen weapon’s Hit worsened by 1;
- Fight with the chosen weapon’s Hit worsened by 1 for that exchange.
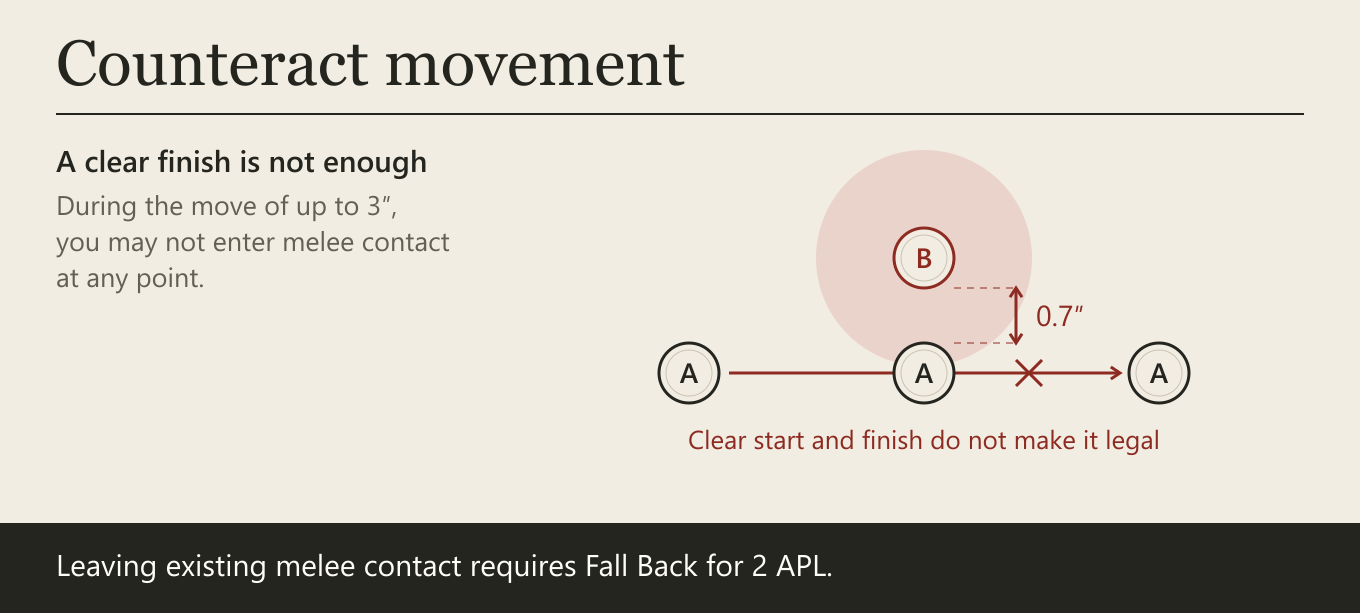
A fighter in melee contact cannot choose the Counteract move. At no point along the route may it enter melee contact, and it must finish more than 1 inch from every enemy. Clear start and end positions are not enough if the route passes through contact. Leaving existing melee still requires Fall Back for 2 APL.
Counteract is not a new activation, restores no APL and removes no states. If the player cannot or does not wish to Counteract, they pass this opportunity and the opponent activates their next ready fighter. Once the opponent has no ready fighters, no new Counteracts occur.
After the final activation, resolve its Overwatch window. The round then ends when every fighter on both sides is activated. Unused Overwatch markers remain until their owner’s next activation or another stated ending condition.
Shooting
Aim — 1 APL
Choose one ranged weapon. Improve its Hit by 1 for its next Shoot action during this activation. Aim cannot be used in melee contact or repeated during one activation. The bonus applies only to the next Shoot with the chosen weapon and expires at the end of the activation. It does not apply to Overwatch.
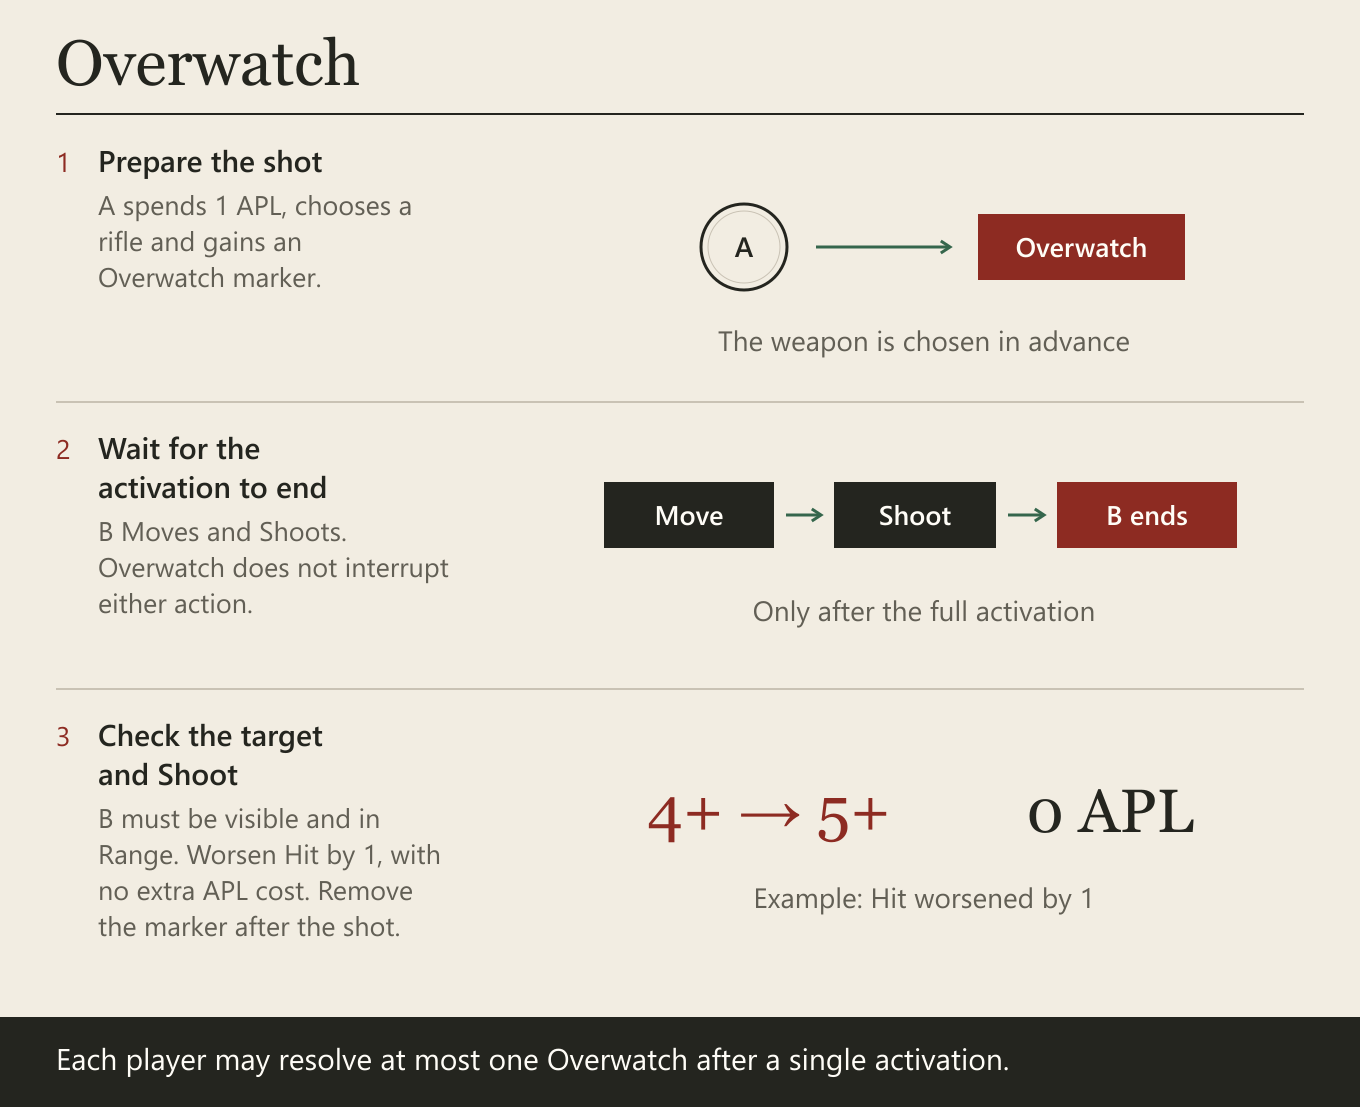
Overwatch — 1 APL
Choose one ranged weapon and place an Overwatch marker. A fighter in melee contact cannot prepare Overwatch.
After an enemy fighter completely finishes its activation, a marked fighter may Shoot it with the chosen weapon if it is now an eligible visible target within Range. Worsen Hit by 1. This requires no additional APL and is not an activation or Counteract. Resolve normal Shooting, including friendly fire, cover and Take Cover. It never interrupts or rewinds the enemy’s actions.
Each player may resolve no more than one Overwatch after a single enemy activation. Remove the marker after Shooting. Otherwise it remains until the beginning of the owner’s next activation, or is removed immediately if its owner is incapacitated or enters melee contact. A fighter with an Overwatch marker cannot Counteract. Counteract and Overwatch do not create further Overwatch windows.
Overwatch example. A spends 1 APL and selects a rifle. B then Moves and Shoots. Only after B completes its entire activation may A resolve Overwatch, provided B is visible and in Range. The rifle’s Hit is worsened by 1; B still uses cover and may Take Cover.
Shoot resolves one complete ranged attack with one chosen weapon.
Restrictions
- The shooter names one visible enemy fighter as the declared target.
- Ordinary ranged weapons can fire across the whole battlefield in this edition.
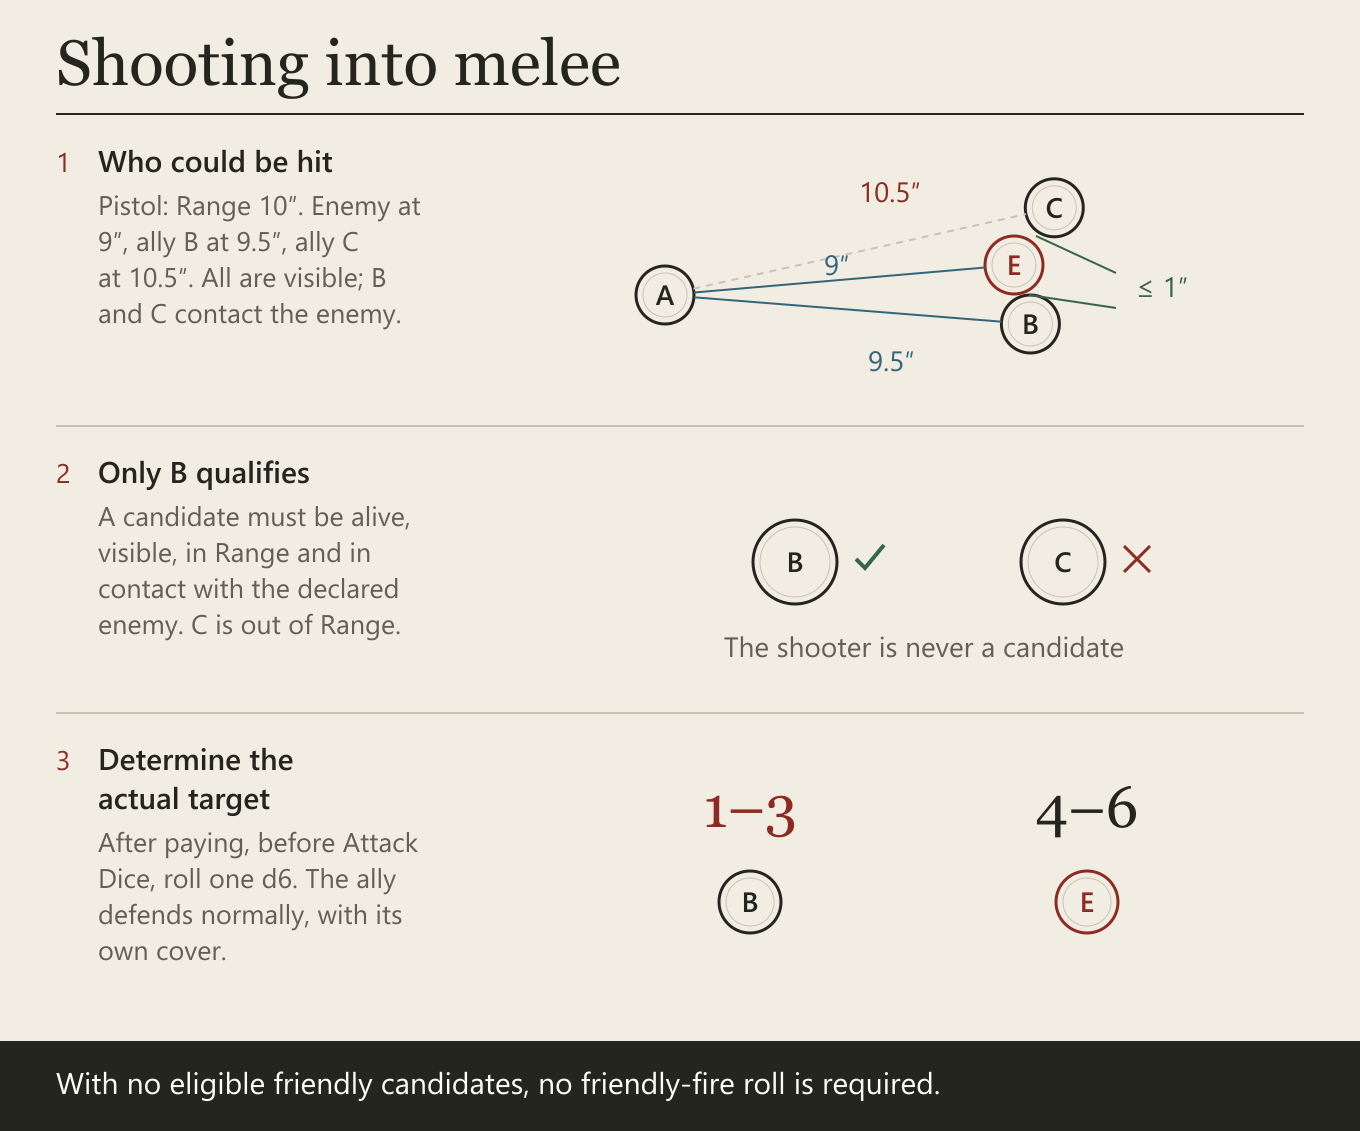
- A pistol has Range 10 inches.
- A fighter in melee contact cannot fire an ordinary weapon.
- A fighter in melee contact may fire a pistol, but only at a visible enemy in melee contact with the shooter. If several qualify, choose one. Worsen the pistol’s Hit by 1.
A second Shoot action in the same activation is a new action: choose weapon and target again and resolve a complete new attack.
Shooting into melee
After choosing the weapon and checking the declared enemy target, identify living friendly fighters that are in melee contact with that enemy, visible to the shooter and within the chosen weapon’s Range. The shooter itself is never a candidate. If there are no candidates, no friendly-fire roll is required. Otherwise, after paying for the action but before Attack Dice, roll one d6:
1–3— the friendly fighter becomes the actual target;4–6— the declared enemy remains the actual target.
If several friendly fighters qualify, select one at random with equal odds. For example, roll one d6 for each candidate; the highest result selects the target, re-rolling only tied highest candidates until one remains.
Determine the actual target once, then apply its own cover and other modifiers. A friendly target defends normally and may Take Cover; bonuses belonging to the original target do not transfer. Do not choose a new weapon or target after this roll.
Ranged attack sequence
- Choose a weapon. Check its type and restrictions.
- Choose a target. Check visibility, cover and Range.
- Determine the actual target. Roll for friendly fire if required.
- Determine final Hit. Combine all improvements and penalties.
- Roll Attack Dice. Use the weapon profile and all pool modifiers, including −1 Attack Die for Injury.
- Select hits. Natural ones and results below Hit miss. Successes below six are normal hits; sixes are critical hits. With no hits, the attack ends: there is no defence roll and Take Cover is unavailable.
- Offer Take Cover. Decide after the attack roll but before defence.
- Build the Defence Dice pool. Start with the fighter’s Defence and add allowed bonus dice.
- Roll defence.
1–3fail,4–5are normal saves, and6is a critical save. - Cancel hits. The defender chooses the order in which saves are spent.
- Inflict Damage. The attacker chooses the order of remaining hits and resolves them one by one. Each removes HP equal to weapon Damage. Check HP after every hit. If the target is incapacitated, the attack ends and all remaining hits are discarded.
Cancelling hits
- One normal save of
4–5cancels one normal hit. - One critical save of
6cancels either one critical hit or up to two normal hits, chosen by the defender. - A normal save cannot cancel a critical hit.
In the core rules, a critical hit does not inflict extra Damage. Its advantage is that only a critical save can cancel it.
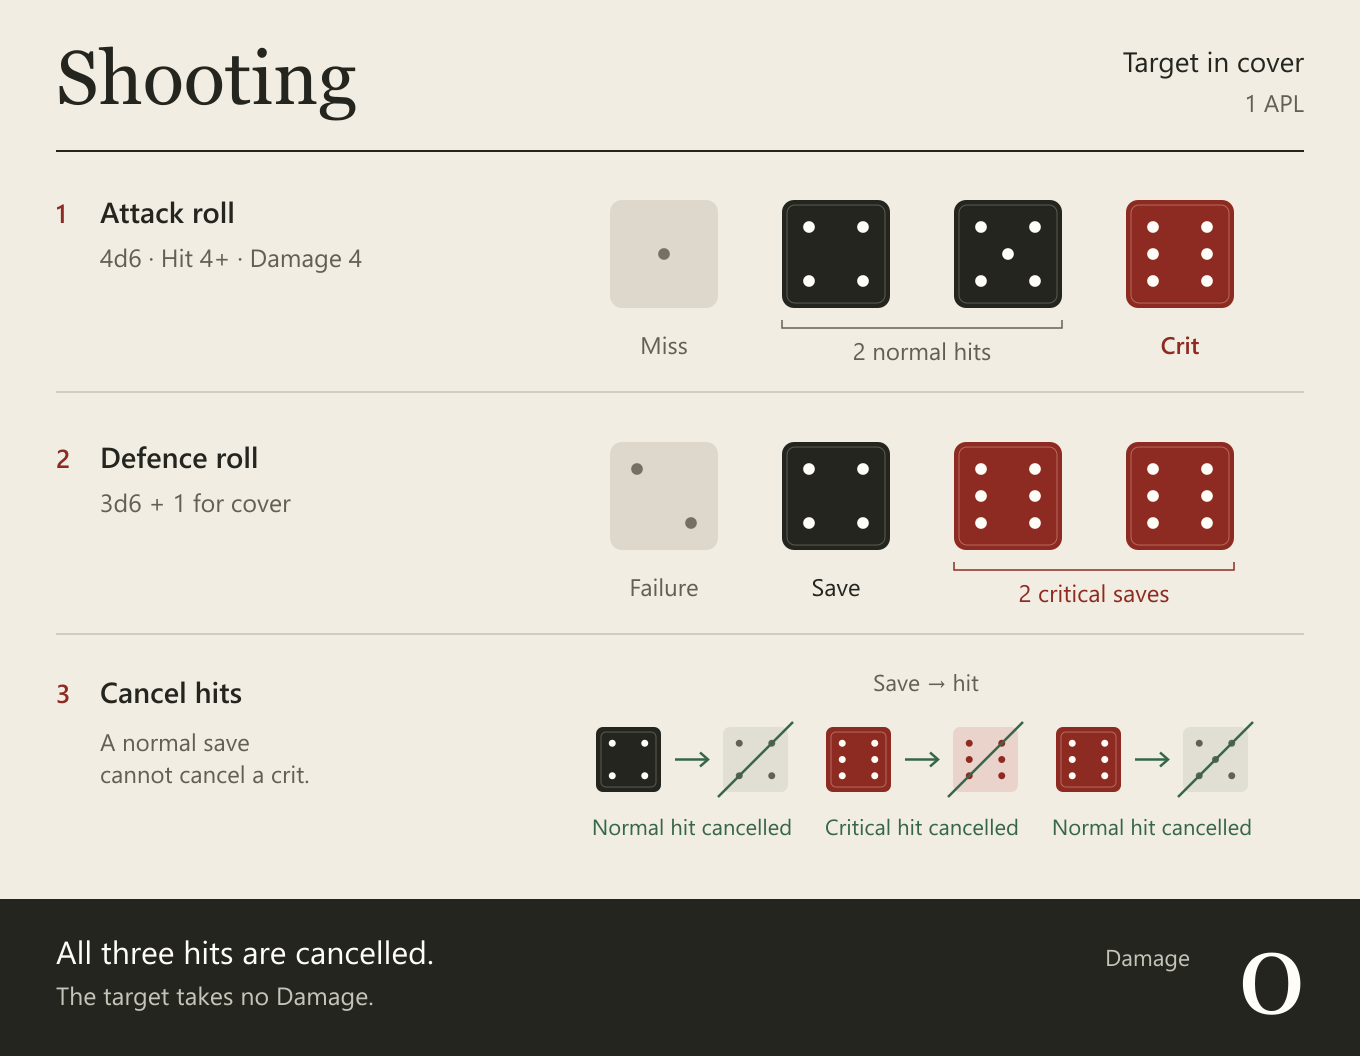
Shooting example
The shooter uses a weapon with 4d6 / Hit 4+ / Damage 4. The target has Defence 3d6 and is in cover, so it rolls 4d6 defence.
Attack: 1, 4, 5, 6
Result: miss on 1; normal hits on 4 and 5; critical hit on 6

Defence: 2, 4, 6, 6
Result: failure on 2; normal save on 4; two critical saves on 6
The normal save cancels one normal hit. The first critical save cancels the critical hit. The second critical save cancels the remaining normal hit. The target suffers no Damage.
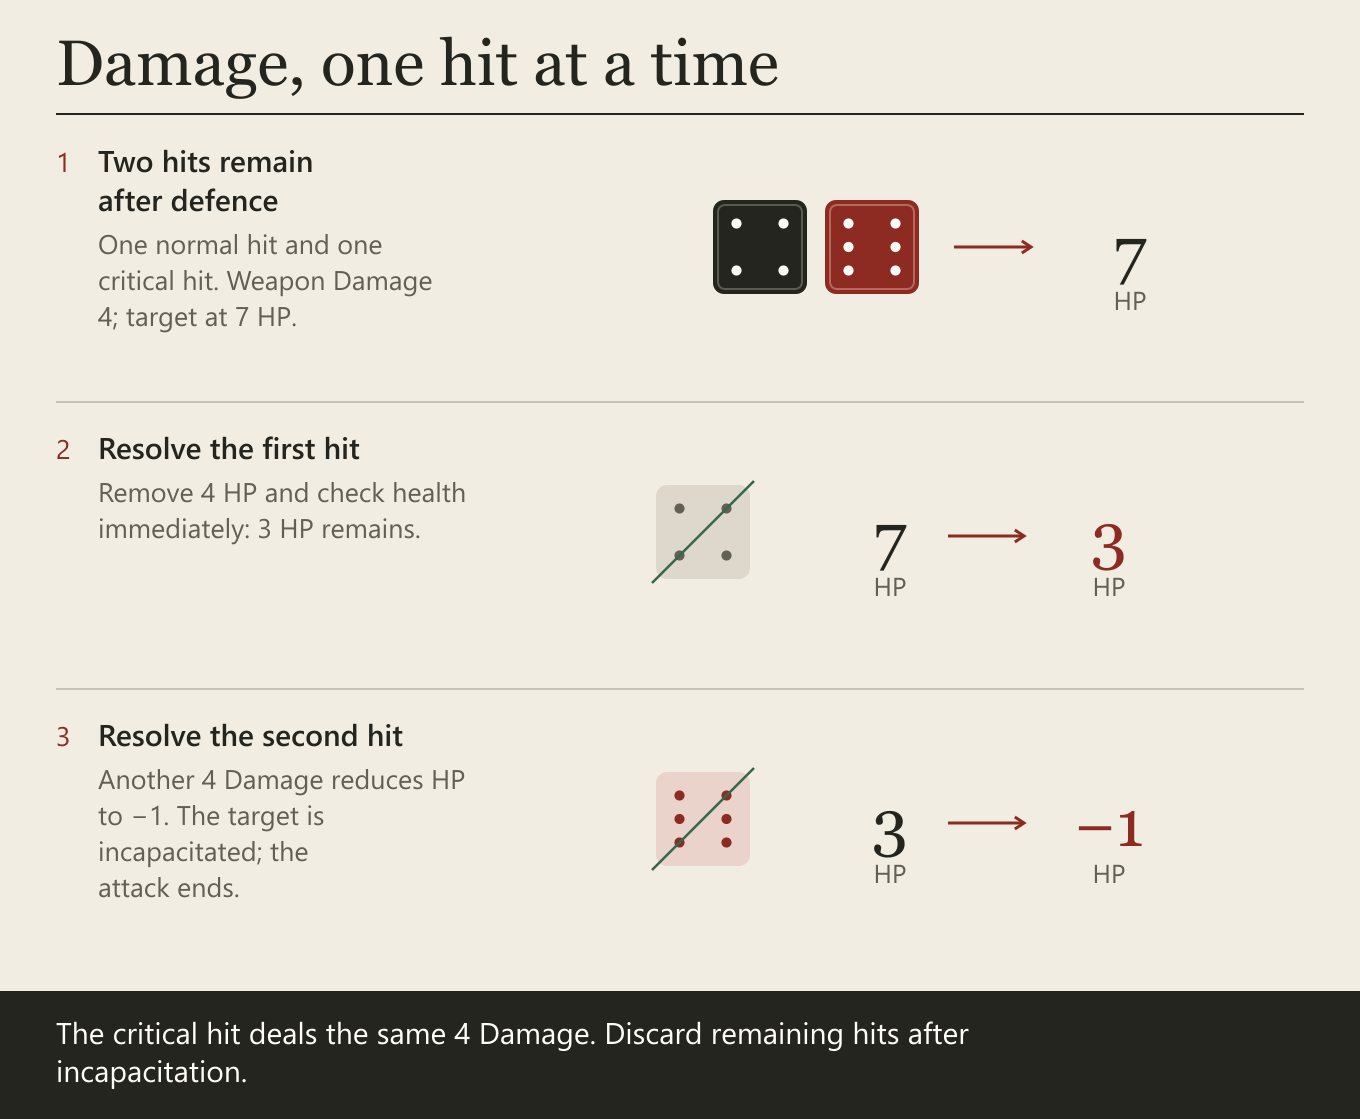
Damage example. In another attack, one normal hit and one critical hit remain after defence. Weapon Damage is 4 and the target has 7 HP. Resolve a hit: it loses 4 HP, leaving 3. The second hit deals another 4 Damage, taking it to −1 HP and incapacitating it. The critical hit deals the same Damage as the normal hit. End the attack and discard any remaining hits.
Take Cover
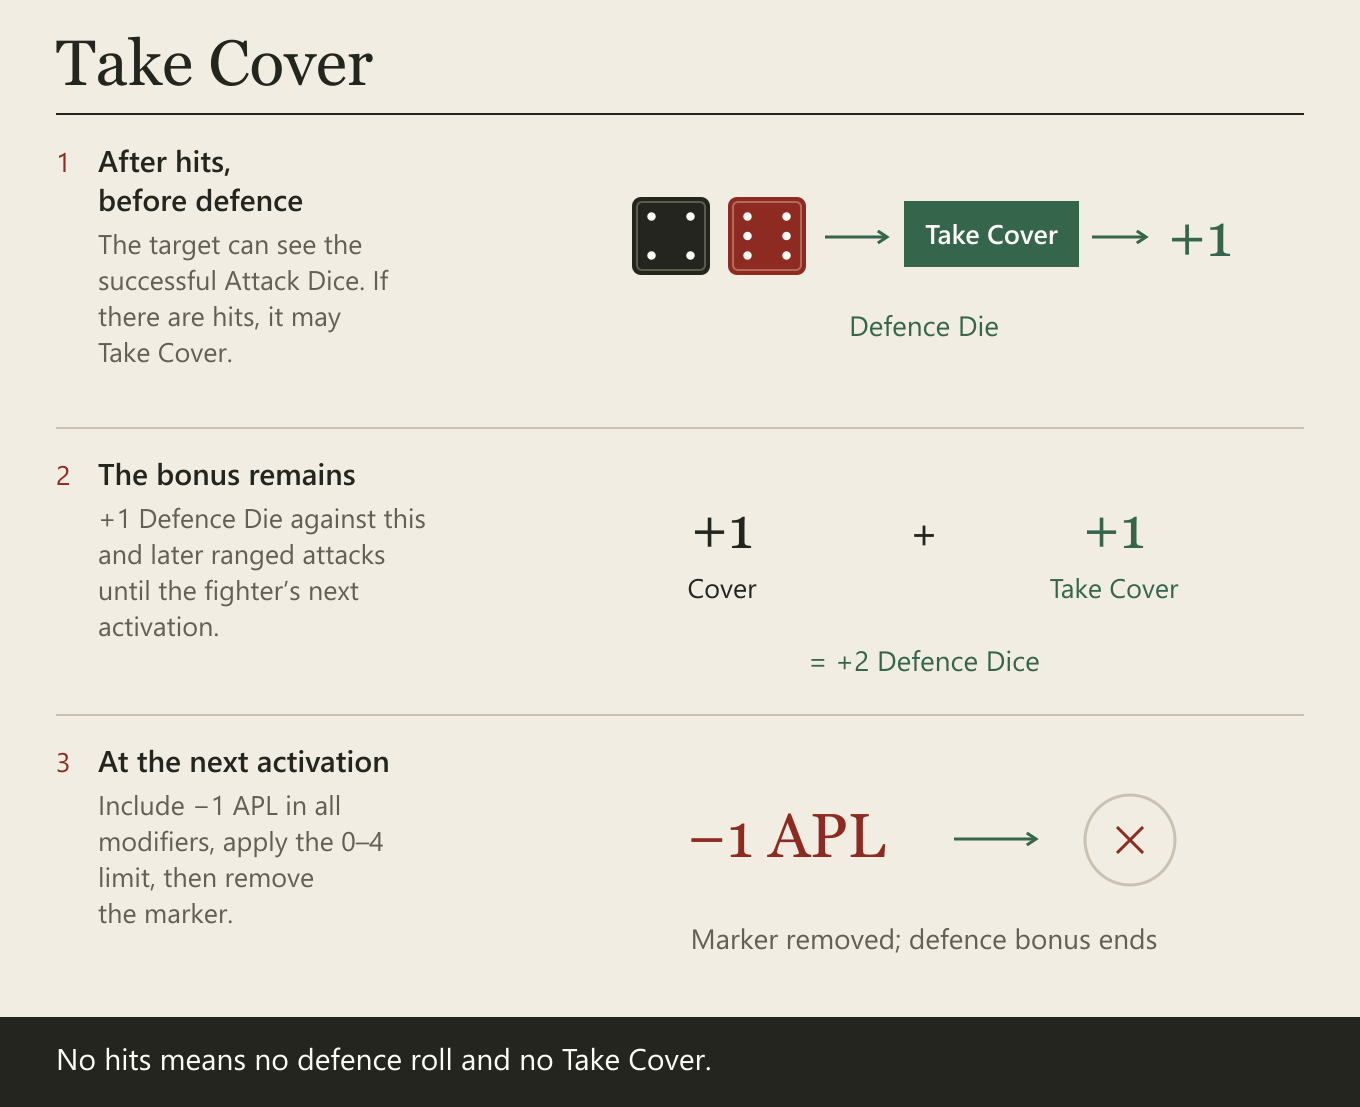
After the ranged attack roll and removal of misses, but before defence, the actual target may Take Cover if at least one hit remains. It does not move or rotate the model.
- The target gains
+1 Defence Dieagainst the current attack and all later ranged attacks until its next activation. - At the beginning of its next activation, include the −1 APL debt in the sum of all modifiers before limiting the result to 0–4.
- After applying the debt, remove the marker. The state and defence bonus end; the debt is not applied a second time and does not carry over.
- Taking Cover again grants neither another Defence Die nor another APL debt.
- Cover and Take Cover are different effects and together grant
+2 Defence Dice.
If Take Cover reduces a fighter with APL 1 to 0 APL, it is still activated normally but cannot pay for actions.
Melee
Melee is an open dice exchange. Both players see the remaining results and decide when to accept a strike, when to Parry, and when to sacrifice a die for control.
One Fight action always selects only one enemy within 1 inch. Other fighters may be nearby, but in the core edition they provide no help and add no dice.
The defender takes part in every exchange declared against it whether it is ready or already activated. This costs no APL, is neither an activation nor a Counteract, does not change the defender’s activation status, and does not limit its participation in later exchanges during the round.
Exchange terms
The attacker is the active fighter that declared Fight.
The defender is the selected enemy.
Exchange initiative is the right to resolve the next die. It is unrelated to round initiative.
A pool contains a fighter’s successful and unspent Combat Dice.
To spend a die is to remove it from the current exchange. A new Fight action creates new pools for both fighters.
An initiative sequence is one fighter’s uninterrupted possession of initiative. It ends when initiative passes to the opponent or the exchange ends.
Preparing the exchange
- The attacker selects one enemy within 1 inch.
- Each player chooses one melee weapon for their participating fighter.
- Determine the final Hit of each chosen weapon.
- Both players roll their weapon’s Combat Dice simultaneously.
- Remove natural ones and all other results below that weapon’s Hit as failures.
- Leave normal successes and critical sixes visible.
- The attacker gains exchange initiative.
Do not add dice together. Every die in a pool is a separate opportunity to Attack, Parry or Guard.
Attack
The fighter with initiative chooses and spends one die from its pool. That value becomes the Attack result. The die is spent regardless of the defender’s response.
The defender chooses Take or, when possible, Parry.
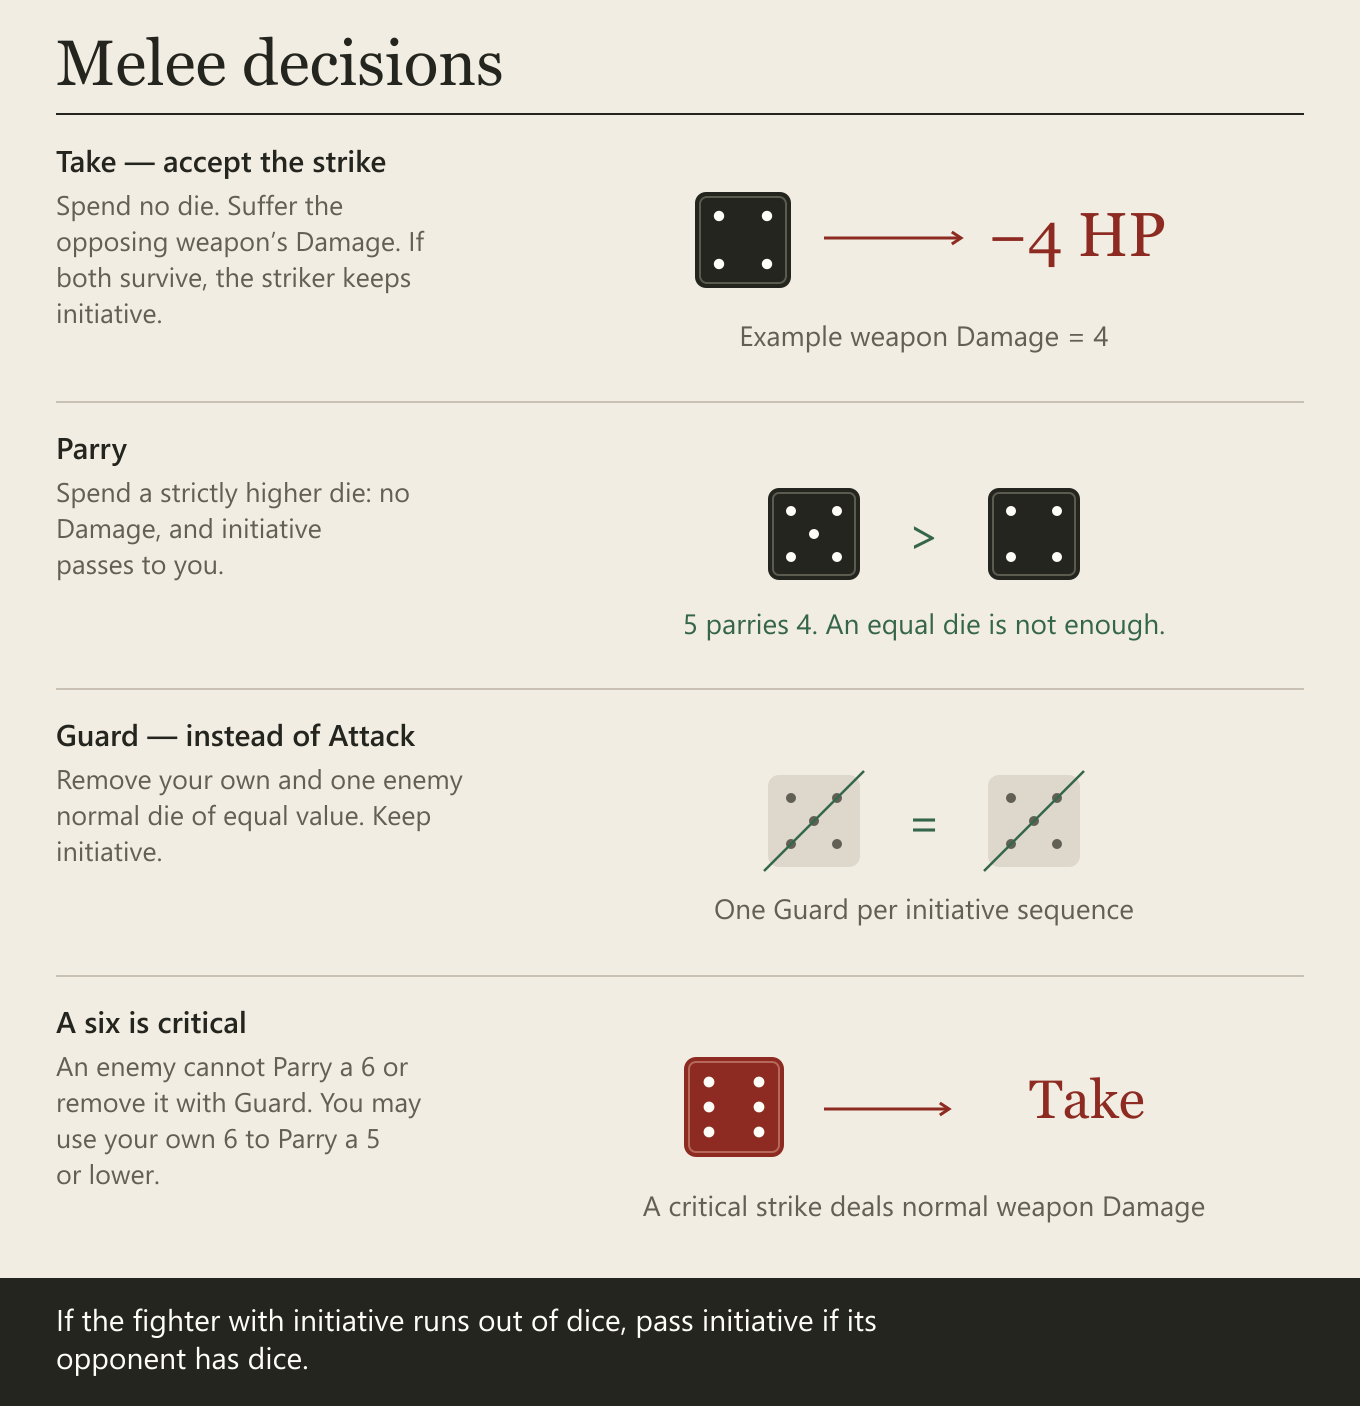
Take — accept the strike
The defender spends no dice and suffers the attacking weapon’s Damage.
Initiative remains with the attacker. If it has dice left, it may immediately Attack again or use an available Guard.
Parry
The defender chooses and spends one die from its pool that is strictly higher than the Attack result.
- remove both the attacking and defending dice;
- the defender suffers no Damage;
- initiative passes to the defender;
- the defender begins a new initiative sequence.
If the defender has no strictly higher die, Parry is unavailable and it must Take.
Guard — control the pools
Instead of Attacking, the fighter with initiative may choose one of its normal dice and one equal normal enemy die. Spend both.
Guard inflicts no Damage and does not pass initiative. Each fighter may use Guard no more than once during a single initiative sequence. If it loses initiative and later regains it, Guard is available again in the new sequence.
A six cannot be selected by Guard.
Critical six
A critical 6 always passes Hit.
- An Attack with a six cannot be Parried because no higher d6 result exists.
- An opponent cannot remove a six with Guard.
- The defender must Take an Attack made with a six unless a special rule says otherwise.
- The owner of a six may voluntarily spend it to Parry a result of
5or lower. - A critical Attack inflicts normal weapon Damage, not extra Damage.
Running out of dice
- If the fighter with initiative has no dice while its opponent does, initiative immediately passes to the opponent and a new sequence begins.
- If the defender has no dice, it cannot Parry and must Take every Attack.
- If neither fighter has dice, the exchange ends.
Check HP immediately after every instance of Damage. If either fighter is incapacitated, the exchange ends at once and all remaining dice are discarded.
If both fighters survive after their pools are exhausted, they remain in melee contact. The active fighter may spend another 1 APL to begin a new Fight action with new rolls.
Complete melee example
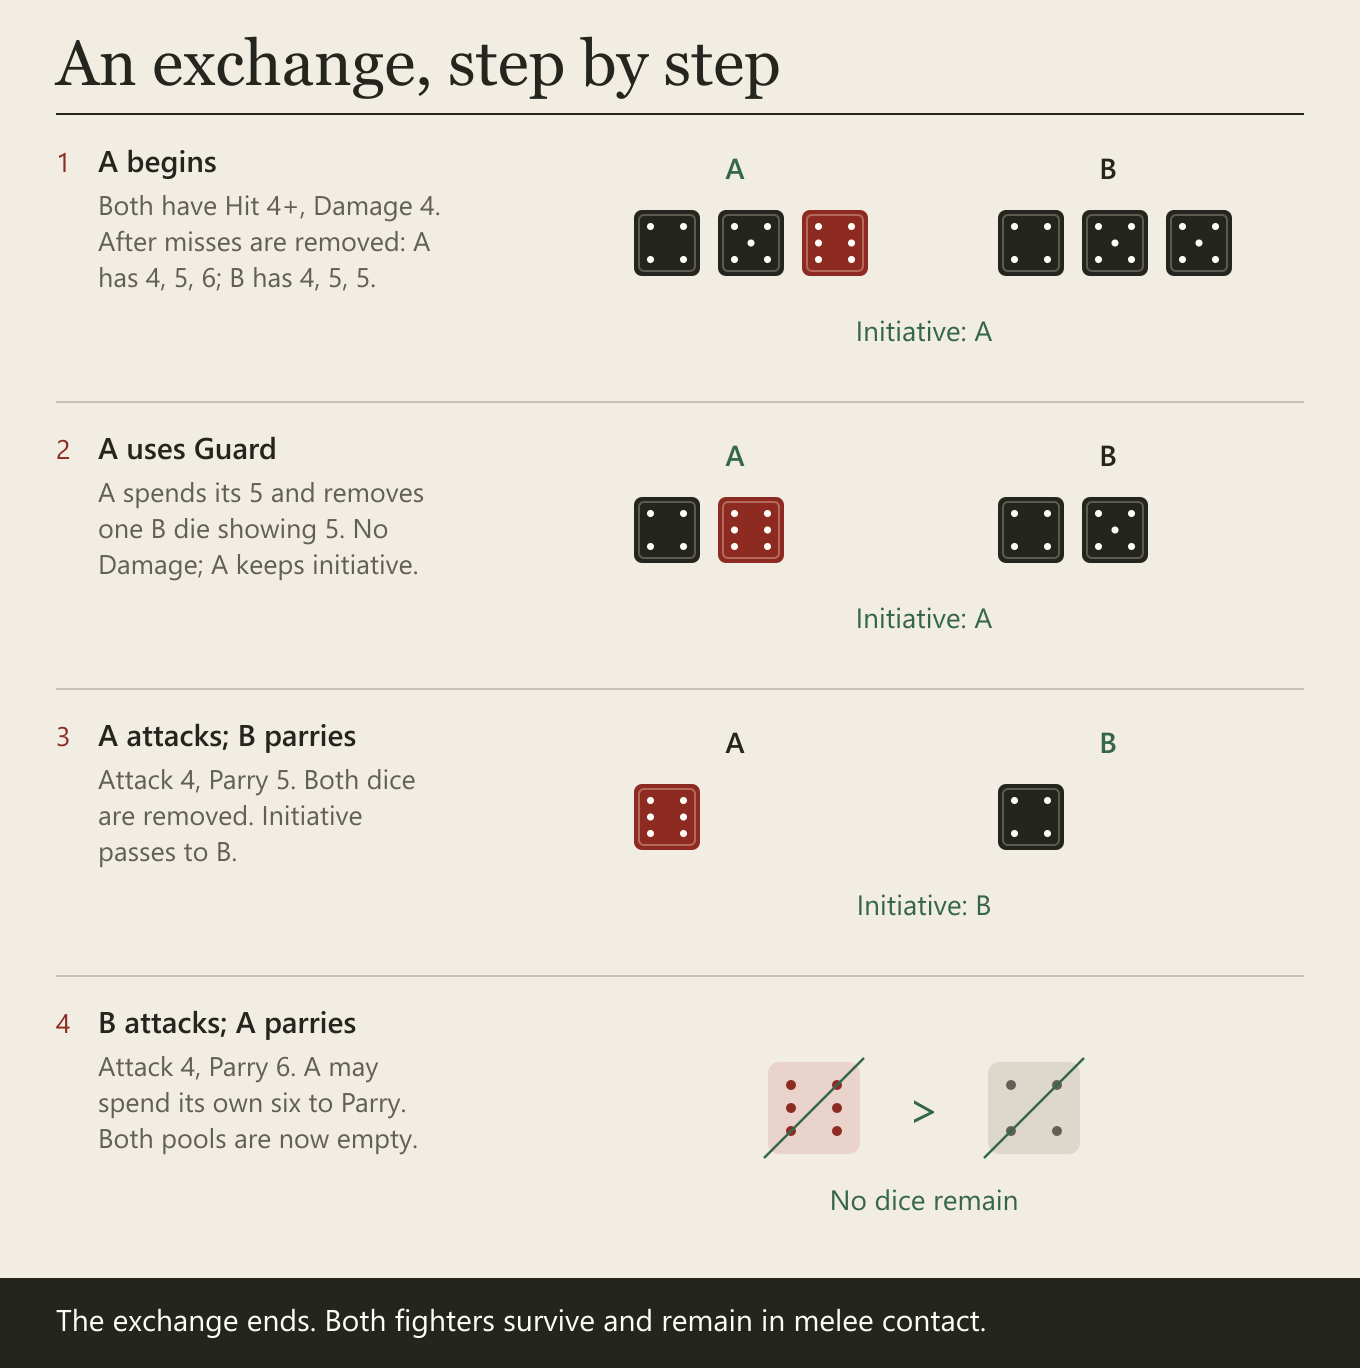
Both fighters use weapons with Hit 4+ and Damage 4.
A rolls: 2, 4, 5, 6 → A pool: 4, 5, 6
B rolls: 1, 4, 5, 5 → B pool: 4, 5, 5
The 2 and 1 fail. A is the attacker and begins.
- A uses Guard, spending its
5and removing one of B’s5s. A keeps initiative. Pools: A —4, 6; B —4, 5. - A Attacks with
4. B Parries with5, so both dice are removed and B gains initiative. Pools: A —6; B —4. - B Attacks with
4. A spends its critical6to Parry. Both last dice are removed; initiative returns to A. - Both pools are empty. The exchange ends, both fighters survive and remain in melee contact.
Alternatively, A could have begun with an Attack using 6. B could neither Parry it nor remove it with Guard and would have to Take Damage 4. A would retain initiative if both fighters survived.
Initiative and different weapon Damage
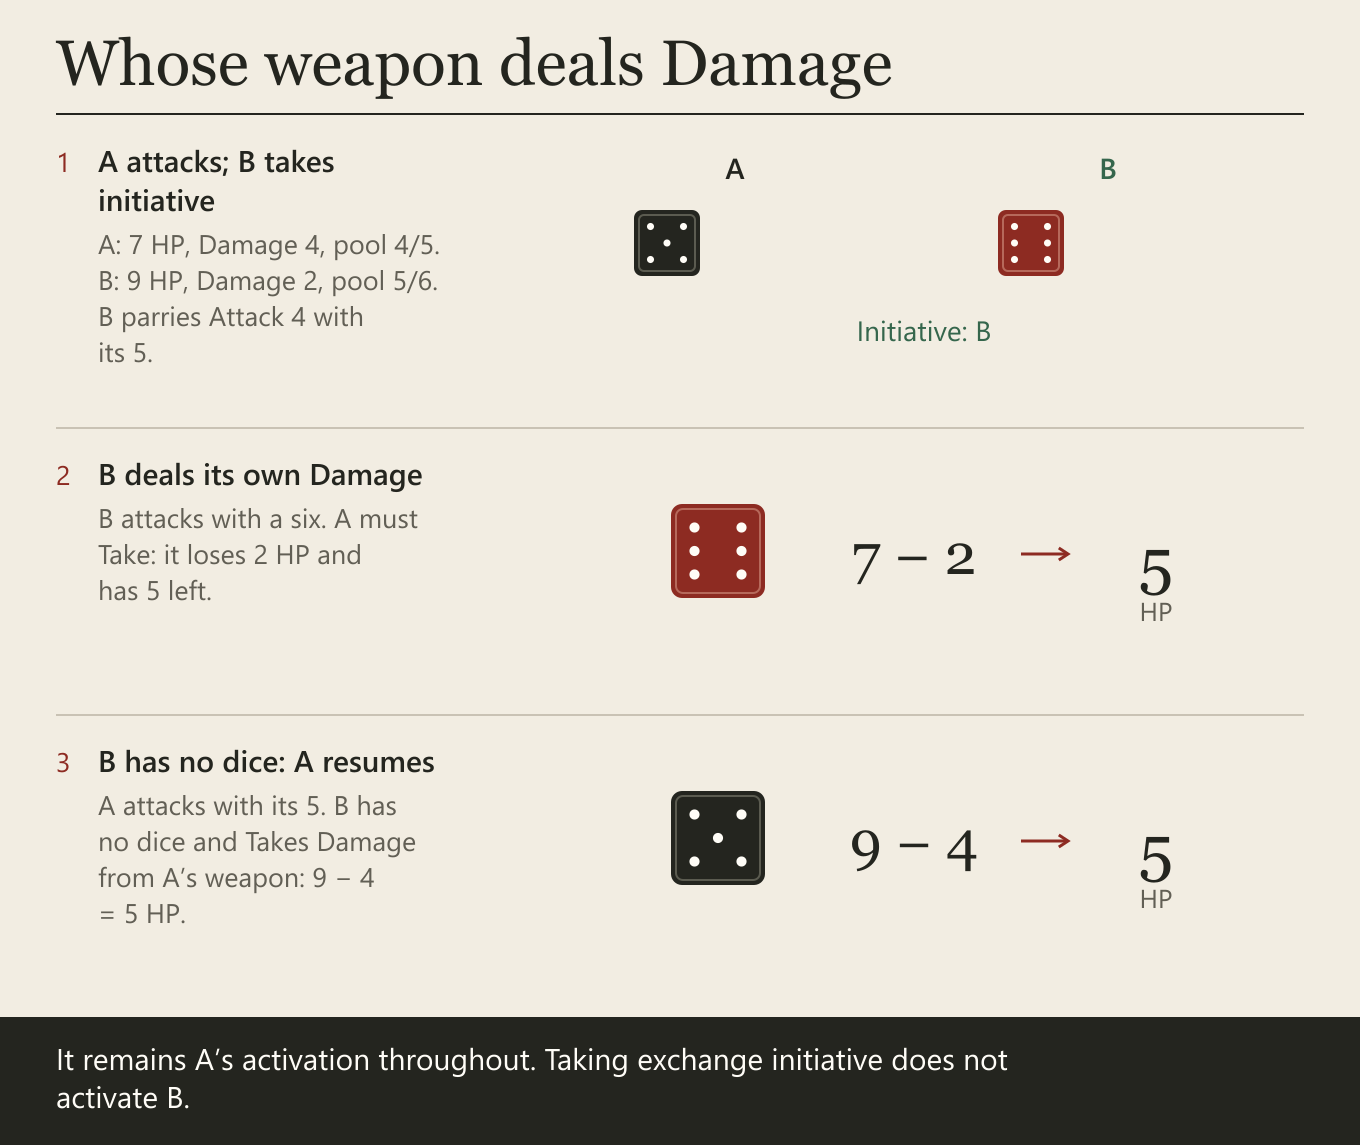
A starts Fight during its own activation: 7 HP, weapon Damage 4, successful pool 4, 5. B has 9 HP, weapon Damage 2, pool 5, 6.
- A Attacks with
4; B Parries with5. No Damage. Pools: A —5; B —6. B gains initiative. - B Attacks with
6. A must Take the strike from B’s weapon: 2 Damage leaves A at 5 HP. - B has no dice, so initiative passes to A. A Attacks with
5; B has no dice and must Take 4 Damage from A’s weapon, leaving B at 5 HP. - Both pools are empty. It has been A’s activation throughout. If A has APL left, it may continue; B has spent no APL and its activation status has not changed.
HP and incapacitation
Whenever a fighter suffers Damage, immediately reduce its current HP.
Injury
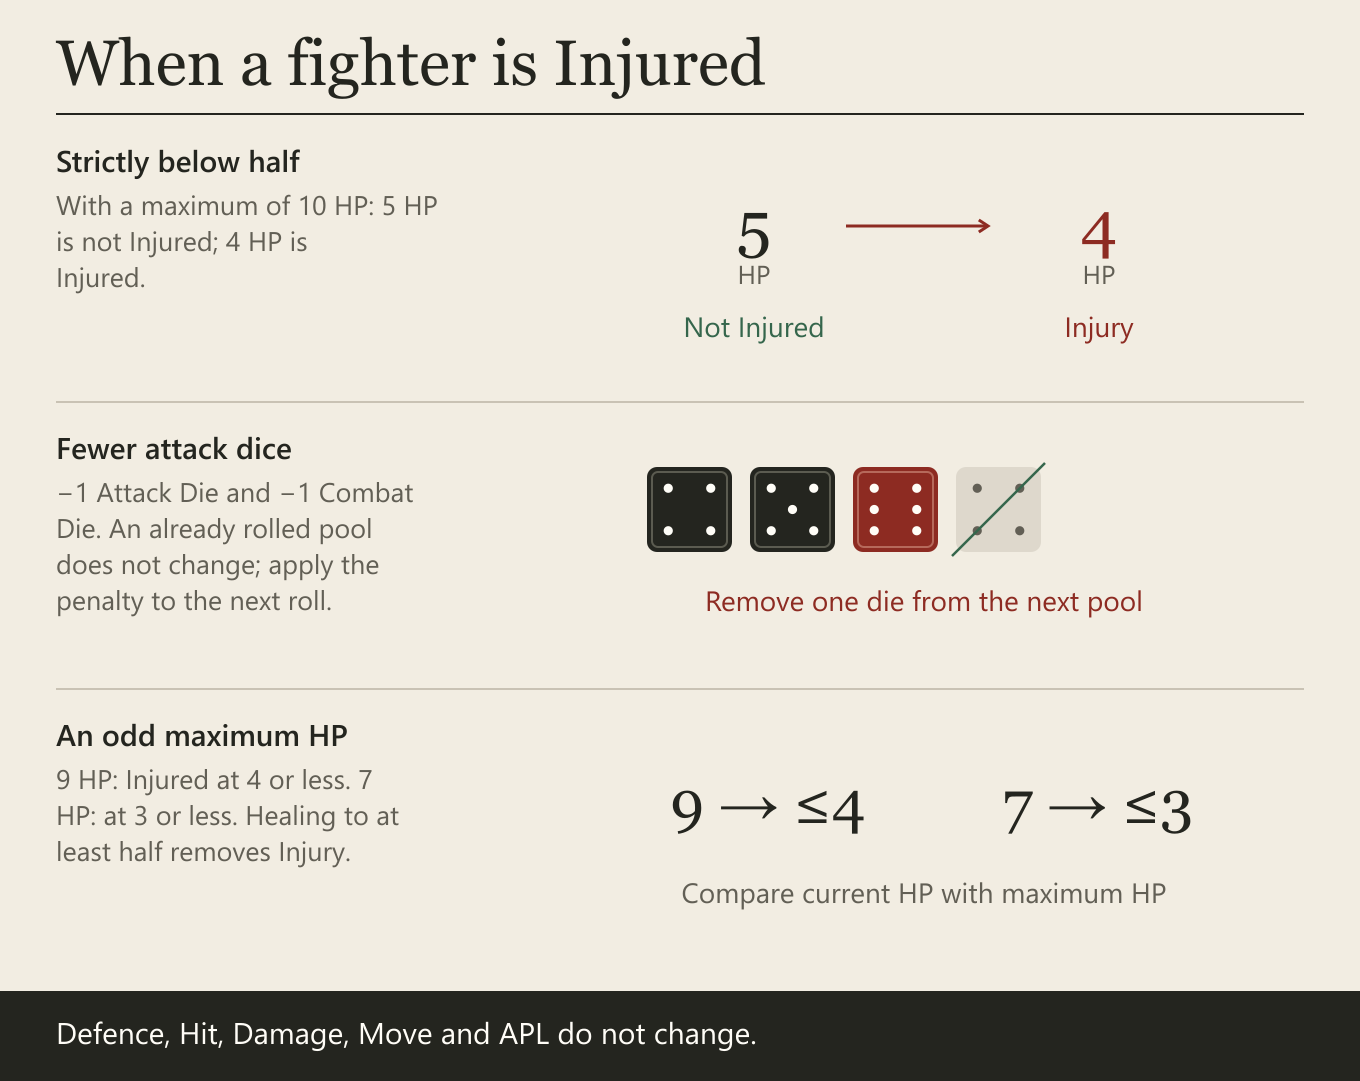
A fighter is Injured when its current HP is strictly below half its maximum. At a maximum of 10 HP, this means 4 or less; at 9 HP, 4 or less; at 7 HP, 3 or less.
While Injured, each ranged weapon has −1 Attack Die and each melee weapon has −1 Combat Die. The penalty also applies to Overwatch and Counteract. Defence, Hit, Damage, Move and APL do not change. Injury does not stack with itself.
Check immediately after each HP change. An already rolled pool is not changed; the penalty applies to the next Attack Dice or Combat Dice roll. Healing to at least half maximum HP removes Injury. Recover alone does not remove it unless a healing rule explicitly says so.
At 0 HP or less, the fighter is incapacitated:
- it cannot activate or Counteract;
- it does not contest points;
- it does not affect movement or visibility;
- remove the model or replace it with a flat, non-blocking marker.
If the active fighter is incapacitated, its current action and activation end immediately and all unspent APL is lost. If another participating fighter is incapacitated, the current action ends; a surviving active fighter may continue its activation and spend its remaining APL. APL already spent on the action is never refunded, regardless of the result.
If one side has no living fighters, its opponent immediately wins a complete victory regardless of current VP.
Preparing the first game
The first game uses the scenario Three Loot Points.
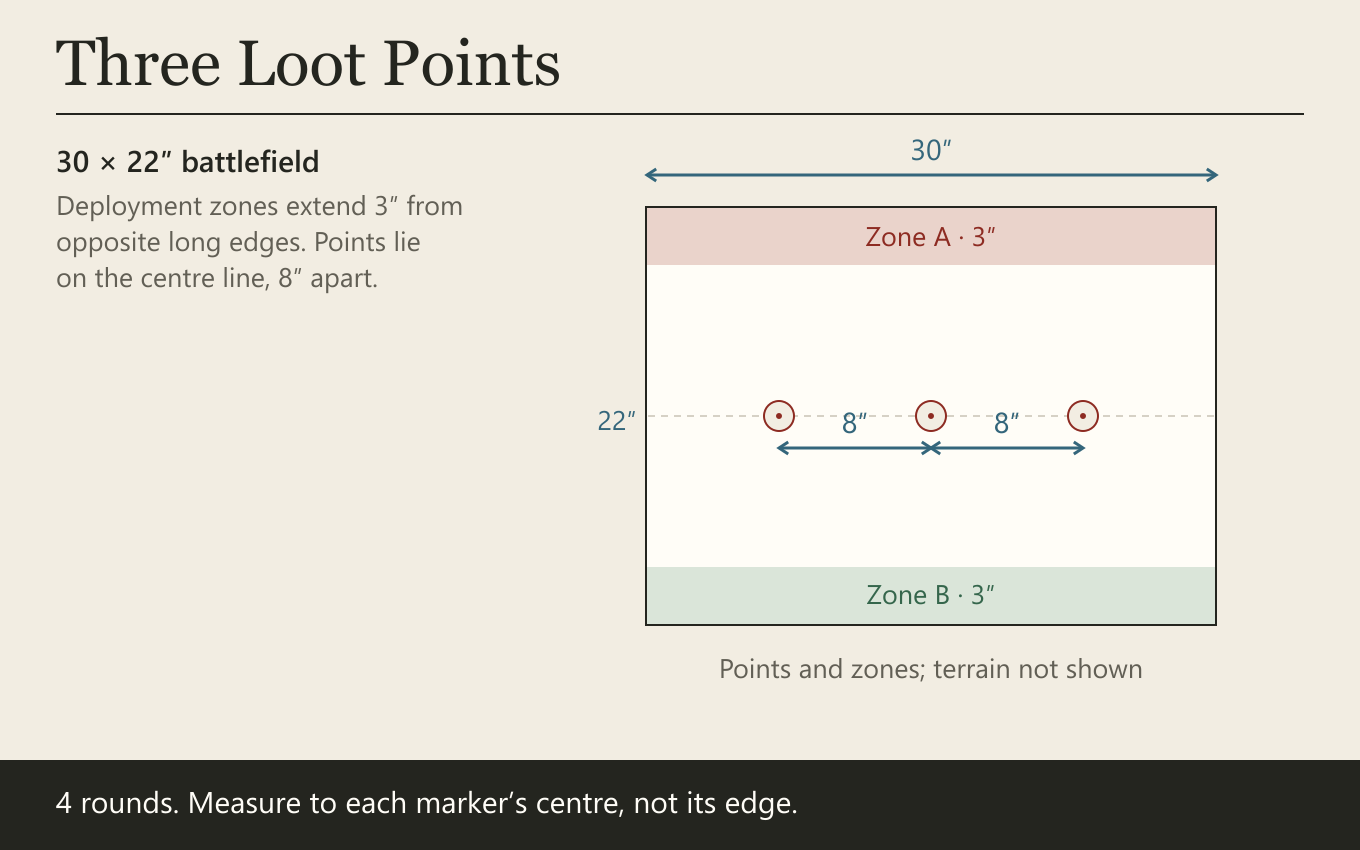
- Prepare a 30×22 inch battlefield. As a guide, use 3–4 large blocking pieces, 4–6 medium ruins or barricades, and several small pieces. There must be no clear, uninterrupted firing lane between deployment zones.
- Mark deployment zones within 3 inches of opposite long edges.
- Place three Loot Points on the centre line: one in the centre and two 8 inches to either side. Use flat markers about 40 mm in diameter.
- Roll off. The winner chooses a deployment zone.
- Starting with the other player, alternate deploying one fighter fully within your zone until both warbands are deployed.
- Roll off again. The winner chooses the first player for round one.
Three Loot Points
Loot — 1 APL
A point is the dimensionless position at the centre of its flat marker. The marker is neither a model nor terrain: fighters may move across it and stand on it. Measure all distances to the point’s centre regardless of the marker’s physical size. A 40 mm marker is recommended.
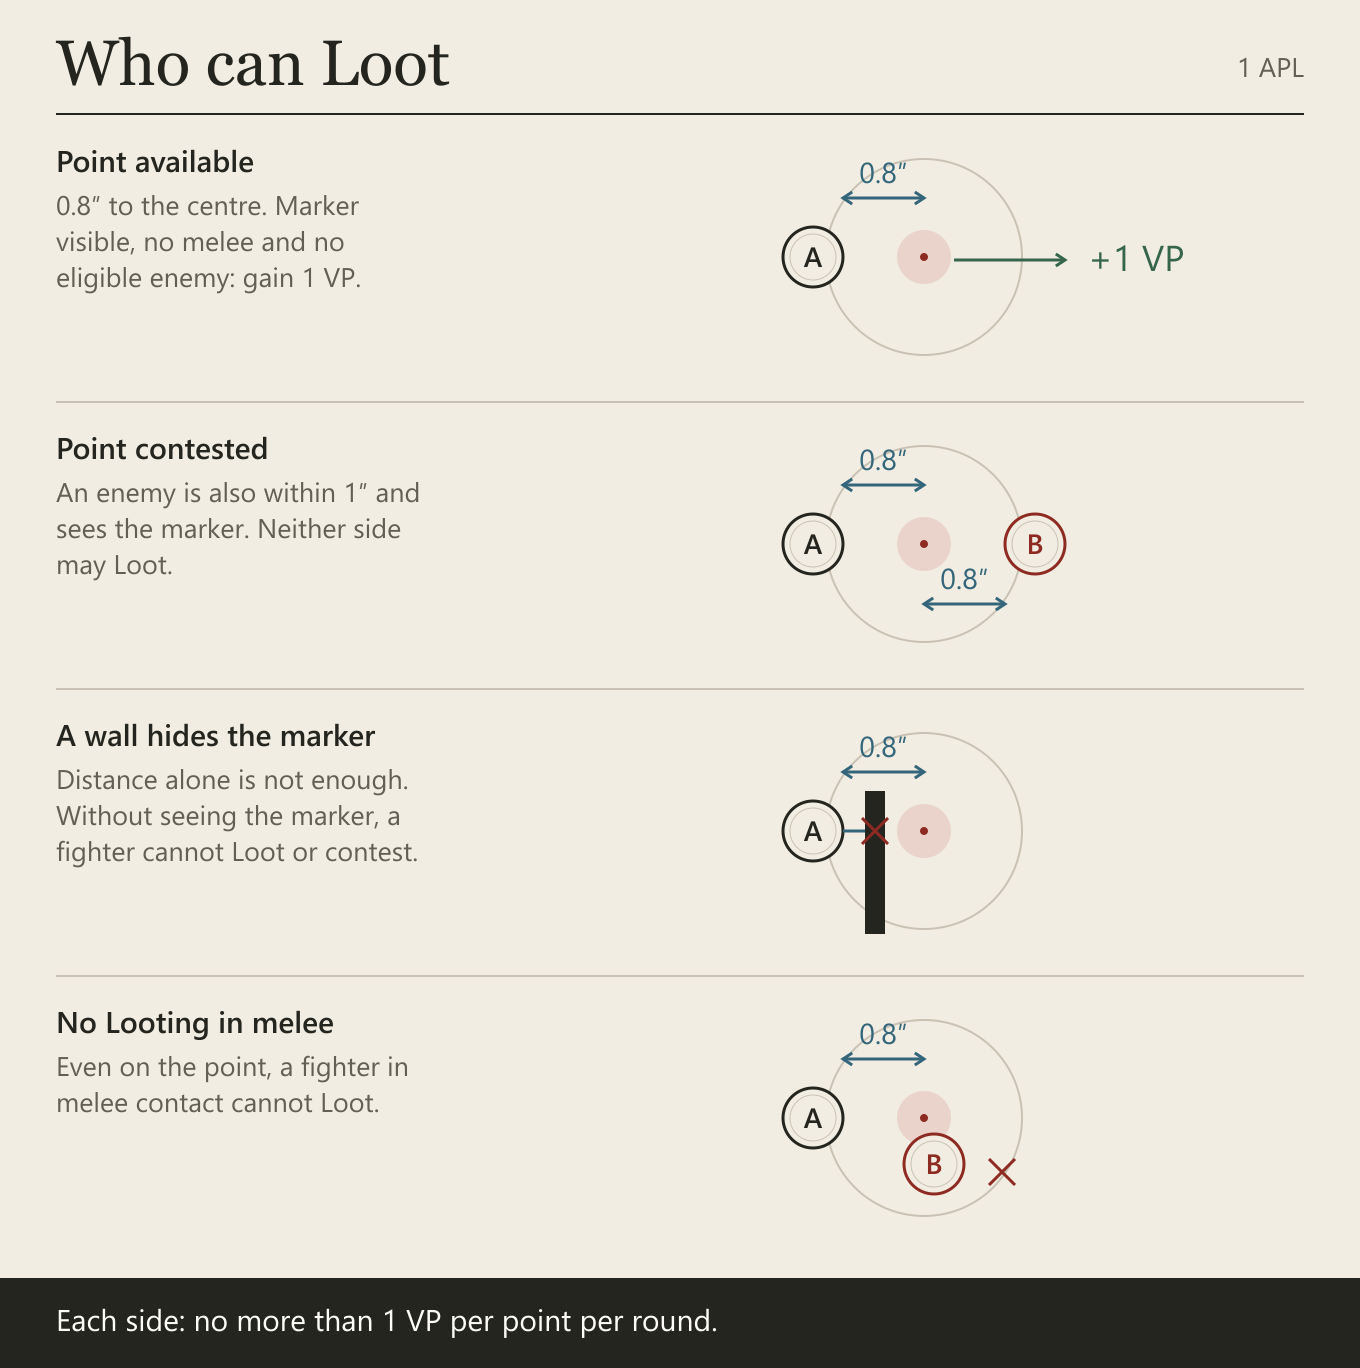
A fighter whose base is within 1 inch of a point’s centre may Loot if it can see some part of the marker and is not in melee contact. Check visibility from that fighter’s head. For this check only, mentally ignore models, bases and tokens directly covering the marker; do not move them. All other terrain and models block visibility normally.
- A fighter in melee contact cannot Loot.
- If a living enemy is within 1 inch of the same point and can see its marker, the point is contested and Loot is unavailable. A solid wall that hides the marker prevents both Looting and contesting, even within 1 inch.
- A successful Loot action immediately grants the fighter’s side 1 VP.
- Each player may gain no more than 1 VP from each point per round.
- After Looting, place a marker in that player’s colour on the point.
- An opponent’s marker does not prevent you from gaining your own point if it is no longer contested.
- Remove all Loot markers at the beginning of the next round.
Each side can gain no more than 3 VP through Loot per round.
Victory
If one side destroys every enemy fighter, it immediately wins a complete victory.
Otherwise, the game ends after round four. The side with more VP wins. A tie in VP is a draw.
A complete defeat does not erase campaign rewards or other results already earned by the losing side unless a separate rule explicitly says so.
Rules priority
The core edition resolves effects sequentially rather than simultaneously.
- Fully complete the current action before beginning another.
- A specific card, weapon or scenario rule overrides a general rule.
- A direct prohibition overrides permission.
- An additional rule that creates several effects must state their order.
- Systems with genuinely simultaneous effects are not part of v0.1.
If the rules do not cover a situation, do not create a permanent rule during the game. Choose the simplest temporary solution, record it in the playtest log, and continue.
Game sequence
Prepare the battlefield, points, warbands and deployment zones
→ deploy fighters
→ determine the first player
→ begin the round and ready fighters
→ alternate activating one fighter at a time
→ if you run out of ready fighters first, use Counteracts
→ end the round when all fighters are activated
→ repeat for four rounds
→ determine the winner by VP or complete victory
During an activation:
receive available APL
→ declare an action and its target
→ check all known conditions
→ spend its APL
→ fully resolve the action
→ choose another action or end the activation
→ mark the fighter as activated